Setting Up the Adagios Web Interface for Nagios
Traducciones al EspañolEstamos traduciendo nuestros guías y tutoriales al Español. Es posible que usted esté viendo una traducción generada automáticamente. Estamos trabajando con traductores profesionales para verificar las traducciones de nuestro sitio web. Este proyecto es un trabajo en curso.
Adagios offers a more intuitive interface for observing and configuring the Nagios server-monitoring system. Adagios has the key features from Nagios readily available, while keeping the messier details out of the way.
In this tutorial, learn how to get started with Adagios on a CentOS Stream 8 or similar system. Follow along to install Adagios and start using it to monitor your servers.
Before You Begin
If you have not already done so, create a Linode account and Compute Instance. See our Getting Started with Linode and Creating a Compute Instance guides.
Follow our Setting Up and Securing a Compute Instance guide to update your system. You may also wish to set the timezone, configure your hostname, create a limited user account, and harden SSH access.
Your Linode Compute Instance needs to be running CentOS 8 or a comparable distribution. The instructions in this tutorial have been specifically tested on CentOS 8, but should be compatible with systems like AlmaLinux 8 and Rocky Linux 8 as well.
Your Compute Instance needs to be on the Linode 8 GB Shared CPU plan, at minimum, as these instructions require a large amount of disk space.
sudo. If you’re not familiar with the sudo command, see the Users and Groups guide.Getting Started with Nagios
Before diving into Adagios, you should have a base familiarity with Nagios, the tool that Adagios provides an interface for. If you are not familiar with Nagios, continue reading and follow the links below to learn more.
What Is Nagios?
Nagios is a widely used server-monitoring tool. Nagios provides robust server monitoring with highly configurable notification and alert options along with a host of official and community plugins.
How to Install Nagios
Before getting started with Adagios, Nagios must be installed and configured on your system. To install Nagios, follow our How to Install Nagios on CentOS 8 guide.
Alternatively, refer to the official installation documentation for Nagios Core for details on installing Nagios on other operating systems.
Keep in mind that Adagios is built primarily with CentOS and other RHEL-based systems in mind. For that reason, this tutorial focuses on CentOS Stream 8. The instructions should work similarly for distributions like AlmaLinux 8 and Rocky Linux 8.
How to Start Using Adagios with Nagios
Adagios runs on top of Nagios to provide a cleaner and simpler interface for managing a Nagios server-monitoring instance. Follow along with this section of the tutorial to learn more about Adagios and get a full walkthrough for setting it up.
Why Use Adagios?
Adagios is a web interface for managing Nagios configurations. While Nagios comes with its own web interface, Adagios offers a more approachable dashboard for monitoring performance and managing a Nagios configuration. Adagios hides more of the low-level details, making it easier to get a quick view of a system and control the monitoring configuration.
Additionally, Adagios provides a RESTful API for accessing and managing a Nagios instance. This makes Adagios a broadly useful enhancement to the default interfaces offered by Nagios.
Installing Adagios
On most systems, the best way to install Adagios is from source. This approach makes the Adagios configuration easier to manipulate, which is necessary depending on where Nagios is installed.
Setting Up the Prerequisites
First, install dependencies for Adagios from the package manager:
sudo dnf install epel-releasesudo dnf config-manager --set-enabled powertools sudo dnf install git acl mod_ssl python36 python36-devel python3-pip python3-setuptools make gcc-c++sudo pip3 install --upgrade pipInstall the Livestatus add-on for Nagios. The add-on provides features to enhance how status information about hosts and services are retrieved. Opin Kerfi, the maintainers of Adagios, also maintain a package to conveniently pull the Livestatus installation files:
cd /tmp
wget https://droppa.ok.is/dl/data/8b15d652f132667abbf0b80dd9d956d4cc368d1c/mk-livestatus-1.2.6.tar.gz
tar -xvzf mk-livestatus-1.2.6.tar.gz
cd mk-livestatus-1.2.6
sudo ./configure --with-nagios4
sudo make
sudo make install
Complete the Livestatus installation by creating a directory for Nagios to store the Livestatus socket and placing that information in the Nagios configuration file:
sudo mkdir -p /usr/lib/nagios/mk-livestatus
sudo chown nagios:apache /usr/lib/nagios/mk-livestatus
echo 'broker_module=/usr/local/lib/mk-livestatus/livestatus.o /usr/lib/nagios/mk-livestatus/livestatus' | sudo tee -a /usr/local/nagios/etc/nagios.cfg
Create a user group and user for Adagios, then assign the Nagios user group to that user.
sudo groupadd --system adagios
sudo adduser --system -g adagios adagios
sudo usermod -aG nagios adagios
Installing and Configuring Adagios
Download the Adagios repository and give its ownership to the Adagios user:
sudo git clone -b master --depth 1 https://github.com/opinkerfi/adagios.git /opt/adagios
sudo chown --recursive adagios:adagios /opt/adagios/
Prepare directories for Adagios, and move its configuration files onto your system:
sudo mkdir -p /etc/adagios/conf.d /var/lib/adagios /usr/local/nagios/etc/adagios
sudo cp /opt/adagios/adagios/etc/adagios/adagios.conf /etc/adagios/adagios.conf
Adjust the Adagios configuration files to reflect the actual location of your Nagios installation.
The changes here assume your
nagios.cfgfile is stored within the/usr/local/nagios/etc/directory. That should be the case when following the Nagios installation guide linked earlier in this tutorial. However, replace/usr/local/nagios/below with the actual directory containing your installed Nagios files if that directory differs.These changes also disable PNP4Nagios, which adds performance graphing features. However PNP4Nagios is now deprecated, so it is not covered here. To install it anyway, follow Nagios’s instructions and do not execute the
enable_pnp4nagioscommand below.sudo sed -i 's|/etc/nagios|/usr/local/nagios/etc|g' /etc/adagios/adagios.conf sudo sed -i 's|/usr/sbin/nagios|/usr/local/nagios/bin/nagios|g' /etc/adagios/adagios.conf sudo sed -i 's|enable_pnp4nagios = True|enable_pnp4nagios = False|g' /etc/adagios/adagios.conf sudo sed -i 's|# ALLOWED_HOSTS|ALLOWED_HOSTS|g' /etc/adagios/adagios.conf sudo sed -i 's|livestatus_path = None|livestatus_path = "/usr/lib/nagios/mk-livestatus/livestatus"|g' /etc/adagios/adagios.confCopy the remaining Adagios configuration files to the appropriate places on your system, and ensure the Adagios user has the ownership it needs:
sudo cp /opt/adagios/adagios/etc/adagios/conf.d/force_script_name.conf /etc/adagios/conf.d/
sudo cp /opt/adagios/adagios/etc/adagios/conf.d/okconfig.conf /etc/adagios/conf.d/
sudo cp /opt/adagios/adagios/etc/sudoers.d/adagios /etc/sudoers.d/
sudo chown --recursive adagios:adagios /etc/adagios /var/lib/adagios
Set up the Adagios service files, then start and enable the Adagios service:
sudo cp /opt/adagios/contrib/gunicorn.py /opt/adagios/gunicorn.py
sudo cp /opt/adagios/contrib/*.service /etc/systemd/system/
sudo systemctl daemon-reload
sudo systemctl start adagios
sudo systemctl enable adagios
Adagios includes a configuration file for your Apache Web Server instance. Copy that configuration file to the directory for Apache configurations:
sudo cp /opt/adagios/contrib/apache_gunicorn_adagios.conf /etc/httpd/conf.d/Adagios uses a Python virtual environment for orchestrating some of its required features. Execute the included script to set up the necessary virtual environment, then load the environment and run some commands to provide initial configurations.
Again, you need to replace
/usr/local/nagios/below with the actual location of your installed Nagios files if they differ.sudo /opt/adagios/upgrade.sh sudo chown --recursive adagios:adagios /opt/adagios/ su -source /opt/adagios/venv/bin/activate pynag config --append cfg_dir=/usr/local/nagios/etc/adagios pynag config --append "broker_module=/usr/local/lib/mk-livestatus/livestatus.o /usr/lib/nagios/mk-livestatus/livestatus'" exitRestart the Nagios, Adagios, and Apache services for the configuration changes to take effect:
sudo systemctl restart nagios adagios httpd
Installing and Configuring OKConfig
Adagios leverages the OKConfig tool for managing Nagios configurations. Although not necessary, you should install and configure OKConfig to get the most out of Adagios.
Download the OKConfig repository and deploy its initial configurations:
sudo git clone -b master --depth 1 https://github.com/opinkerfi/okconfig.git /opt/okconfig
echo 'export PYTHONPATH=$PYTHONPATH:/opt/okconfig' | sudo tee /etc/profile.d/okconfig.sh
sudo cp /opt/okconfig/etc/okconfig.conf /etc/okconfig.conf
source /etc/profile
sudo ln -s /opt/okconfig/usr/share/okconfig /usr/share/
sudo ln -s /opt/okconfig/usr/bin/okconfig /usr/local/bin/
Make some changes to the default OKConfig configuration. As with the Adagios configuration changes above, these primarily concern pointing OKConfig to the actual location of the
nagios.cfgfile.Adjust the directories in these commands to match the location of your Nagios installation if its files are stored elsewhere.
sudo sed -i 's|/etc/nagios/nagios.cfg|/usr/local/nagios/etc/nagios.cfg|g' /etc/okconfig.conf
sudo sed -i 's|/etc/nagios/okconfig|/usr/local/nagios/etc/okconfig|g' /etc/okconfig.conf
echo 'cfg_dir=/usr/share/okconfig/templates' | sudo tee -a /usr/local/nagios/etc/nagios.cfg
su -
Start up OKConfig by entering the Adagios virtual environment and running the OKConfig commands:
source /opt/adagios/venv/bin/activate
okconfig init
okconfig verify
exit
Restart the Nagios, Adagios, and Apache services for the changes to take effect:
sudo systemctl restart nagios adagios httpd
Navigating Adagios
With Adagios installed and running, you now have access to the Adagios interface for your Nagios instance. Open a web browser and navigate to the /adagios/ path on your system’s public address.
For instance, if your public IP address is 192.0.2.0, navigate to http://192.0.2.0/adagios/. If your system has the domain name example.com, navigate to http://example.com/adagios/.
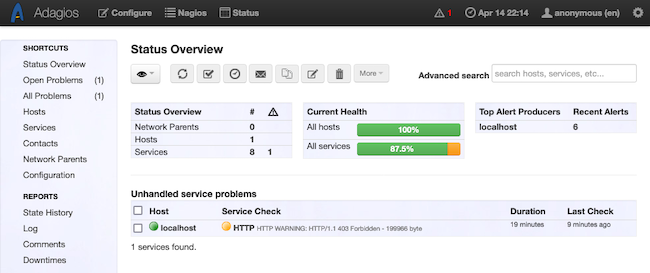
You should be greeted with the Adagios dashboard:
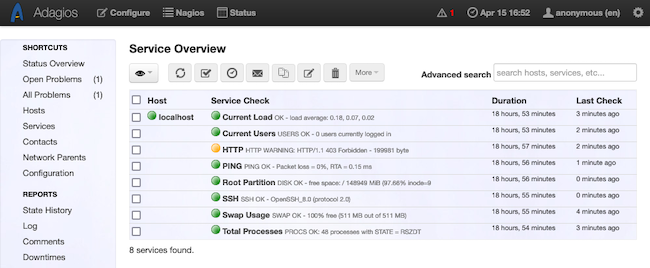
From here, use Adagios to navigate the myriad information about your monitored hosts and services. More details are available through the options on the left menu, such as navigating to the Services page to see a list of monitored services:
Individual items can be selected for even more details.
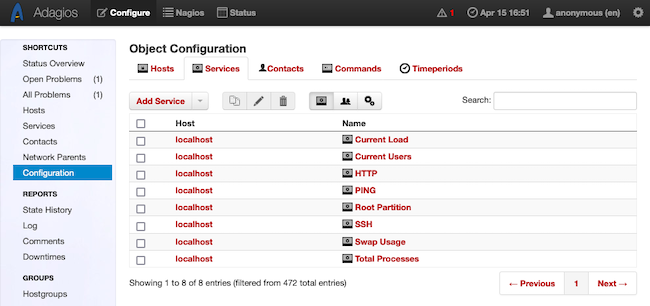
Use the Configuration option from the top of the page to see options for configuring hosts, services, commands, and more within Nagios:
The top menu also has an option for Nagios, providing an inset window with the traditional Nagios interface should you need specific features it provides.
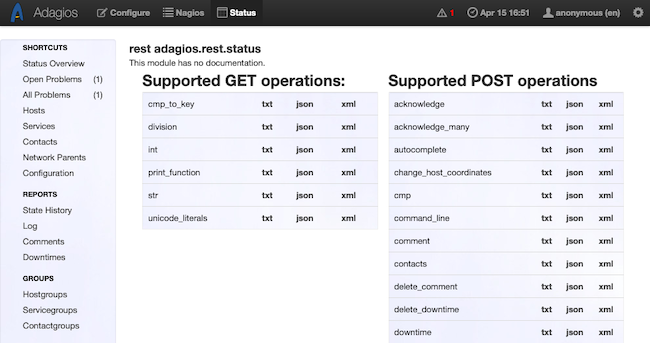
Finally, navigating to the /adagios/rest path opens the menu for documentation of your Adagios instance’s RESTful APIs. There are several options of APIs exposed by the Adagios instance. For example, here is how the status API may look:
Conclusion
Now you have Adagios providing a clean and easy interface for your Nagios system. Be sure to look into all of the menu options the Adagios interface offers. This should give you a thorough idea of the features Adagios offers and how to make the most of them.
To take your Adagios setup even further, follow along with the Adagios user documentation linked below. The documentation on using the REST API features is especially helpful should you want to leverage them.
More Information
You may wish to consult the following resources for additional information on this topic. While these are provided in the hope that they will be useful, please note that we cannot vouch for the accuracy or timeliness of externally hosted materials.
This page was originally published on


