Product docs and API reference are now on Akamai TechDocs.
Search product docs.
Search for “” in product docs.
Search API reference.
Search for “” in API reference.
Search Results
results matching
results
No Results
Filters
Connecting Appsmith to the Linode API
Traducciones al EspañolEstamos traduciendo nuestros guías y tutoriales al Español. Es posible que usted esté viendo una traducción generada automáticamente. Estamos trabajando con traductores profesionales para verificar las traducciones de nuestro sitio web. Este proyecto es un trabajo en curso.
Appsmith is a platform for building applications in a low-code, visual interface. It is an open source tool ideal for quickly developing internal applications with a combination of drag-and-drop UI widgets and JavaScript code.
You can learn more about Appsmith and how to host your own instance in our guide How to Self-host Appsmith with Docker Compose.
This tutorial covers everything you need to connect your Appsmith instance to the Linode API. With this, you can build your own Linode cloud manager or integrate Linode control into your application.
While this tutorial is specifically concerned with the Linode API, similar steps can be readily adapted to numerous other APIs. By the end, you should be prepared to connect other Linode APIs or other external APIs.
Before You Begin
Familiarize yourself with our Getting Started with Linode guide, and complete the steps for setting your Linode’s hostname and timezone.
This guide uses
sudowherever possible. Complete the sections of our How to Secure Your Server guide to create a standard user account, harden SSH access, and remove unnecessary network services.Update your system.
On Debian and Ubuntu, you can do this with:
sudo apt update && sudo apt upgradeOn AlmaLinux, CentOS (8 or later), or Fedora, use:
sudo dnf upgrade
Follow our guide on How to Self-host Appsmith with Docker Compose for steps to install Docker and start running an Appsmith instance on your own server.
sudo. If you’re not familiar with the sudo command, see the Users and Groups guide.Getting Familiar with the Linode API
The Linode API gives you complete access to viewing, configuring, and managing your Linode cloud servers, all with the programmatic accessibility of a RESTful API.
The API has been designed to give both developers and system administrators tools for managing Linode products and services programmatically. Not only that, but it also allows for integrating those services into other applications.
Take a look at the link to the page on the Linode API above to learn more about the API and its capabilities. Then, see the Preparing the Linode API section further on to learn about setting up the Linode API for your own use.
Connecting Appsmith to the Linode API
The next several sections in this tutorial walk you through the steps to connect an Appsmith instance to the Linode API. Follow along to get everything from preparing Linode API credentials through testing the connection to Appsmith.
Preparing the Linode API
To get started using the API, with the prerequisites you need for this Appsmith tutorial, follow our Linode API documentation.
Be sure particularly to follow the steps for authentication, getting either a personal access token or configuring OAuth, depending on your needs.
This tutorial assumes that you have acquired a personal access token for the Linode API. However, you can replace this with an OAuth authentication token in any of the examples that follow.
Creating the Appsmith Authenticated API
Within Appsmith, you typically add an API as a datasource to your application. Specifically, APIs tend to be added as Authenticated API resources.
This series of steps shows you how to create such an Authenticated API for the Linode API’s Linodes Instances, Linode List endpoint. This endpoint provides a list of all Linode instances on your account, along with information like instance IDs, names, and statuses.
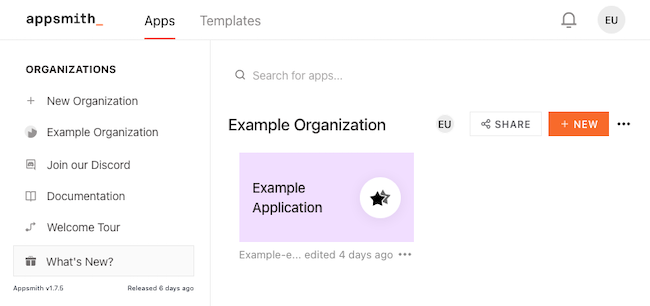
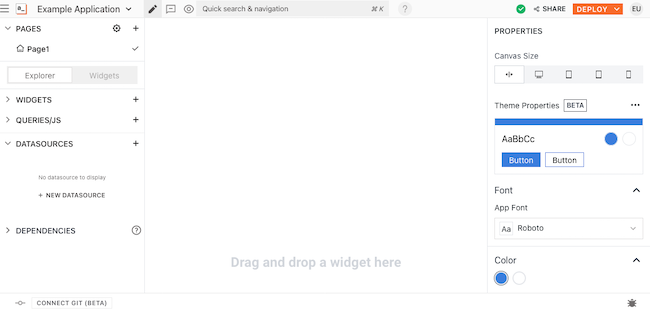
If you just setup Appsmith for the first time, you’ll already be in the edit screen of your first application: skip to step three. If this is an existing installation, create a new application from the Appsmith dashboard by clicking the + New button.
After creating an application, you may be automatically directed to the page for editing the application. Otherwise, hover on the application thumbnail on the dashboard, and click the Edit button.
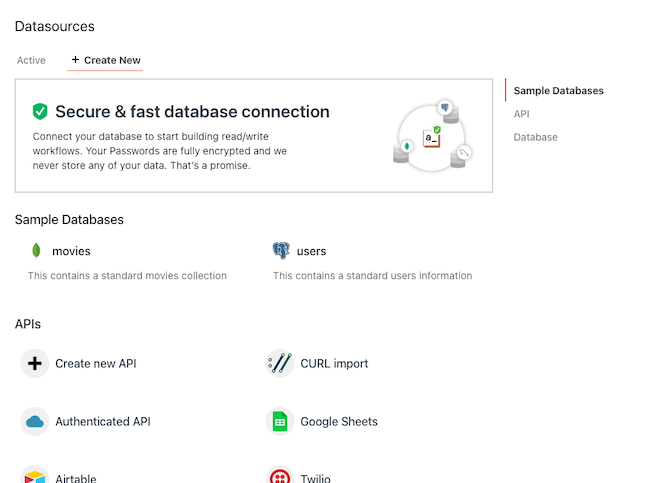
Click the + icon by Datasources on the left menu to view the datasource creation prompt.
Select the Authenticated API option, which directs you to a form where you can enter the API information.
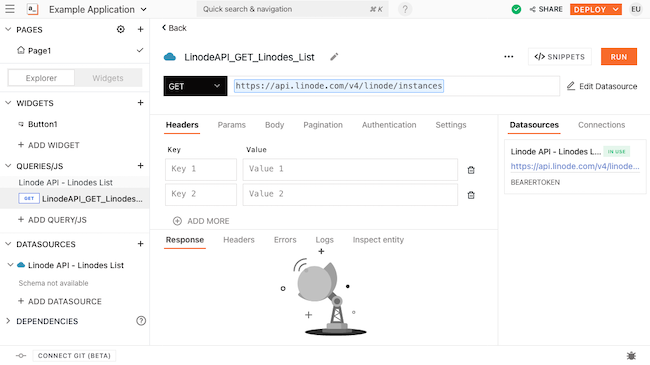
Fill out the form to create a datasource for the Linode API’s Linodes List endpoint. Click the pencil icon to rename it
Linode API - Linodes List. Enterhttps://api.linode.com/v4/linode/instancesin the URL field. In the Bearer Token field, enter your personal authentication token for the Linode API. When complete, your form should look like this: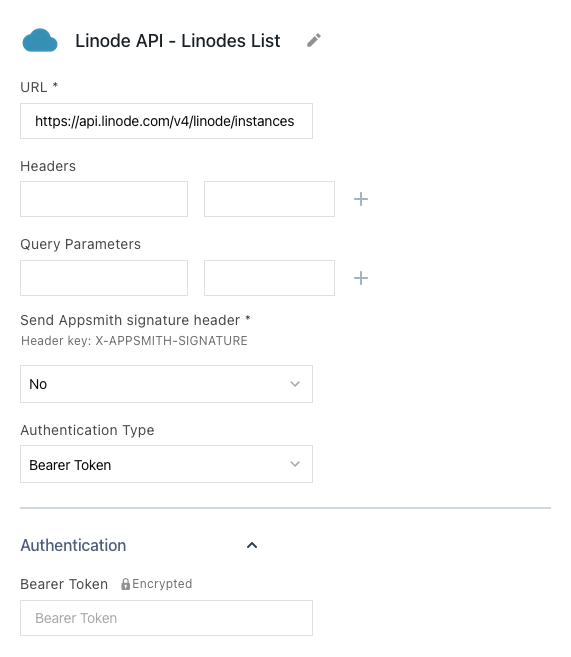
Click Save.
Once created, an Authenticated API can be adjusted at any time. To do so, click the button for the API in the left menu under the Datasources tab. Then, click the Edit button on the API’s information page.
Testing the Connection
The quickest way to test your connection to an Authenticated API in Appsmith is by creating a query. In fact, queries are the basis of all datasource usage in Appsmith. Therefore, this step is necessary to actually start using the API in your application.
Locate the Query/JS option on the left menu, and click the + beside it. Select the newly created Linode API- Linodes List Query from the list of options.

A query creation page displays, with the query URL already in place. Since this example uses a simple
GETendpoint, there is no need for adding headers or parameters. Here, the only required change is to rename the query toLinodeAPI_GET_Linodes_List.Click the Run button in the upper right. The response data from the API displays in the Response area at the bottom of the page.
The following is example response data for the endpoint shown above. It assumes that you have one Linode instance, currently running, using Ubuntu 22.04. IP addresses have been replaced with generic alternatives.
{
  "data": [
    {
      "id": 36982246,
      "label": "Ubuntu-2204-Server",
      "group": "",
      "status": "running",
      "created": "2022-06-22T16:49:18",
      "updated": "2022-06-22T16:49:18",
      "type": "g6-dedicated-4",
      "ipv4": [
        "192.0.2.0"
      ],
      "ipv6": "2001:0db8:85a3:0000:0000:8a2e:0370:7334",
      "image": "linode/ubuntu22.04",
      "region": "us-southeast",
      "specs": {
        "disk": 163840,
        "memory": 8192,
        "vcpus": 4,
        "gpus": 0,
        "transfer": 5000
      },
      "alerts": {
        "cpu": 360,
        "network_in": 10,
        "network_out": 10,
        "transfer_quota": 80,
        "io": 10000
      },
      "backups": {
        "enabled": false,
        "schedule": {
          "day": null,
          "window": null
        },
        "last_successful": null
      },
      "hypervisor": "kvm",
      "watchdog_enabled": true,
      "tags": []
    }
  ],
  "page": 1,
  "pages": 1,
  "results": 1
}
Implementing the API in an Appsmith Application
The Linode API is now ready to use within your Appsmith application. From there, Appsmith gives you myriad ways to implement the API into your application.
These next steps show you a simple example application using the Authenticated API created in the previous sections. The steps gloss over some of the details of application creation in Appsmith, since the focus is on integrating an API.
Instead, these steps highlight the particular pieces that relate to mobilizing the Linode API, both for displaying data and managing Linode products and services.
Displaying the Data
Click Page1 in the left-hand sidebar to get to the editing screen.
Click the + next to Widgets and drag a List widget to the page.
Select the List widget. In the Data section of the Content tab, replace the Items field’s content with
{{ LinodeAPI_GET_Linodes_List.data.data }}.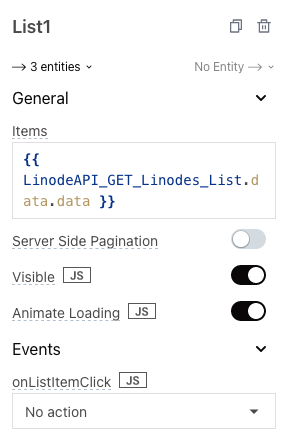
With the List widget, updating the first item updates the way all items display. Click Explorer in the left-hand sidebar, then click the > to expand Widgets, List1, and Container1. Remove the existing Image1, Text1, and Text2 widgets.
Begin adding other widgets. Which widgets you use depends on what information you want displayed for each Linode instance. For this example, the following widgets are added to the List widget:
A Text widget to display the instance ID. Change the Text field in the General section of the widget’s Content tab to
{{currentItem.id}}.A second Text widget to display the instance’s name. Change the Text field in the General section of the widget’s Content tab to
{{currentItem.label}}.A Button widget to display (and later control) the instance’s boot status. In the Basic section of the widget’s Content tab, change the Label field to
{{currentItem.status}}.This example also gives the button dynamic color. To support this, open the widget’s Style tab, and click the JS button next to the Button Color field in the Color section. Replace the contents of that field with
{{App_Logic.linodeInstanceStatusColor(currentItem)}}. You may receive an error, don’t worry, the next steps implement the logic behind this.
Click the Explorer tab in the left-hand sidebar. Create a new JavaScript object by selecting the + beside the Queries/JS button on the left menu. Select New JS Object from the sub-menu that appears.
Name the new JavaScript object
App_Logicand give it the following contents.- File: js
1
2
3
4
5
export default { linodeInstanceStatusColor: (currentItem) => { return (currentItem.status == "running") ? "darkseagreen" : "indianred"; } }
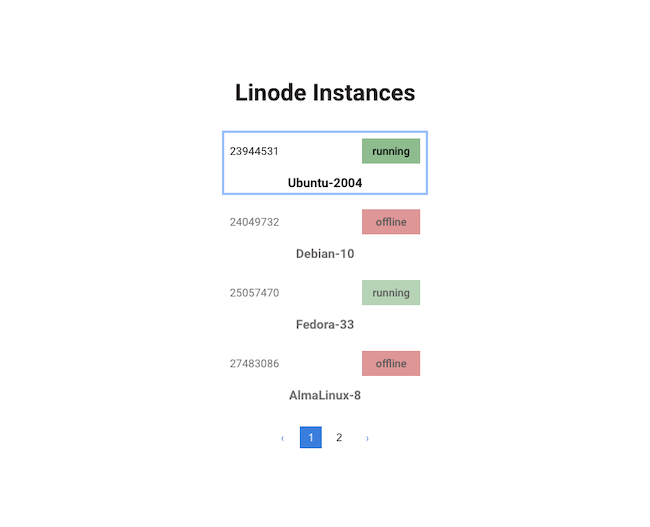
This JavaScript code supports the dynamic coloring for the status buttons on the list of Linode instances. Note that you may have to play with the layout and spacing of your widgets to make your application look exactly like the screenshot below:
Updating the Data
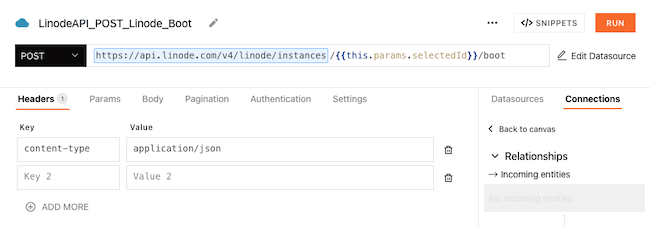
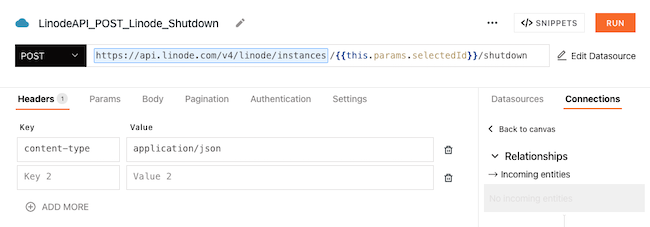
Create two new queries. Click on the + icon by the Queries/JS button on the left menu, and select the Linode API - Linodes List Query datasource from the sub-menu. On the query creation page for each, change the URL type from GET to POST. Modify the URL by appending
/{{this.params.selectedId}}/bootfor the first query and/{{this.params.selectedId}}/shutdownfor the second. Name the first queryLinodeAPI_POST_Linode_Bootand the second queryLinodeAPI_POST_Linode_Shutdown.The resulting query edit pages should look like these:
Open the App_Logic JavaScript object again, and modify the code to contain the following:
- File: js
 1
 2
 3
 4
 5
 6
 7
 8
 9
10
11
12
export default { linodeInstanceStatusColor: (currentItem) => { return (currentItem.status == "running") ? "darkseagreen" : "indianred"; }, linodeApiInstanceOnOrOff: (currentItem) => { if (currentItem.status == "offline") { LinodeAPI_POST_Linode_Boot.run({ selectedId: currentItem.id }); } else { LinodeAPI_POST_Linode_Shutdown.run({ selectedId: currentItem.id }); } } }
The new function,
linodeApiInstanceOnOrOff, accepts an item from the list of Linode instances and calls the appropriate query, depending on whether the instance is on or off.Access the Button widget again. Press the JS button by the onClick field in the Basic section of the Content tab. Enter
{{App_Logic.linodeApiInstanceOnOrOff(currentItem)}}in the onClick field.
This leaves you with a functioning application for managing Linode instances. It provides a list of instances and their statuses, and gives you buttons for toggling each instance on or off.
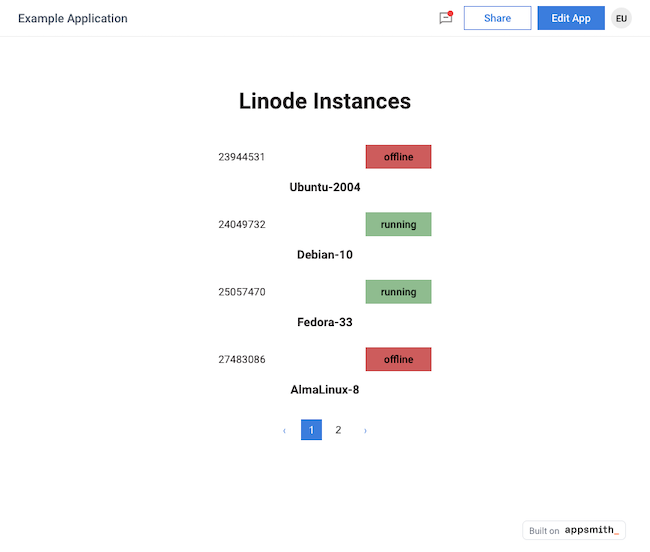
Here is an updated view of the example application, deployed and having switched off the “Ubuntu-2004” instance on switched on the “Debian-10” instance.
Conclusion
In this tutorial, you have the pieces you need to implement your own Appsmith application connected to the Linode API. Moreover, the same steps and tools you have seen in this tutorial can be applied to connect your Appsmith application to other REST APIs.
To keep learning about building applications with Appsmith, you can jump into the tutorials and guides available from Appsmith. These show all the possibilities that the framework has to offer. To start, take a look at the links to the Appsmith documentation provided below.
More Information
You may wish to consult the following resources for additional information on this topic. While these are provided in the hope that they will be useful, please note that we cannot vouch for the accuracy or timeliness of externally hosted materials.
This page was originally published on
