Product docs and API reference are now on Akamai TechDocs.
Search product docs.
Search for “” in product docs.
Search API reference.
Search for “” in API reference.
Search Results
results matching
results
No Results
Filters
How to Install and Configure a Redis Cluster on Ubuntu 16.04
Traducciones al EspañolEstamos traduciendo nuestros guías y tutoriales al Español. Es posible que usted esté viendo una traducción generada automáticamente. Estamos trabajando con traductores profesionales para verificar las traducciones de nuestro sitio web. Este proyecto es un trabajo en curso.
DeprecatedThis guide has been deprecated and is no longer being maintained.



Redis is a NoSQL database used for large-scale storage that allows for fast reads and writes of its data store. Redis clusters are a popular tool for caches, queues, and more because of their potential for scalability and speed. This guide aims to create a cluster using three Linodes to demonstrate sharding. Afterward, a cluster replica is promoted to a master, which provides insurance in the event of a failure.
Redis as an in-memory store allows for extremely fast operations such as counting, caching, queuing, and more. A cluster setup increases the reliability of Redis by reducing the points of failure.
Prior to starting, we recommend familiarizing yourself with the following:
Redis Sentinel or Redis Cluster?
Some wonder if a Redis cluster or Redis Sentinel makes more sense for their environment.
Redis Sentinel allows for failover when a master node fails by automatically promoting one of its replica nodes. However, Sentinel only uses a single master node to handle all data traffic at all times. Effectively, Sentinel is a Redis server backup. If you have a small environment, Sentinel might make more sense for you. See Redis’s documentation for more information.
A Redis cluster can provide the same backup protection as Sentinel, but it differs by distributing data traffic across all of its nodes. This allows for an environment with high traffic to better deal with the demands of that traffic, as opposed to pushing it all through the master node.
Install Redis on Each Linode
Depending on your version of Linux, it may be possible to install Redis through a package manager. Only Redis 3.0 and above supports clustering. The steps below are for installing the latest stable branch of Redis.
Ensure your system is upgraded, then install the dependencies:
sudo apt-get update && sudo apt-get upgrade
sudo apt install make gcc libc6-dev tcl
Note Alternatively, you can install the “build-essential” meta-package to load the dependencies for Redis:
sudo apt install build-essential tclFrom the documentation, download the current stable branch, then extract:
wget http://download.redis.io/redis-stable.tar.gz
tar xvzf redis-stable.tar.gz
cd redis-stable
sudo make install
Ensure the installation is successful by running:
make testIf the installation is successful, the console will output:
\o/ All tests passed without errors!
Repeat installation for each server that will be part of the cluster.
Configure Redis Masters and Replicas
This guide manually connects each of the masters and replicas across three Linodes. Consider using tmux for the management of multiple terminal windows.
This guide uses a minimum of six nodes with the following topology:
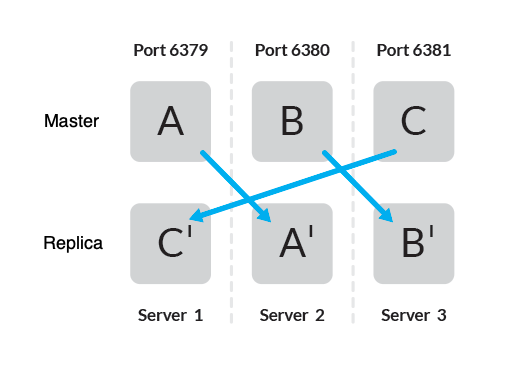
This setup uses three Linodes running two instances of Redis server per Linode: one master node and one replica node. First, you must ensure that each host is independent. You can then consider adding nodes if there is a need to maintain uptime requirements.
SSH into Server 1. Navigate to
redis-stable/then copyredis.conf. Configuration files in this guide are named consistent with the figure above:cp redis.conf a_master.conf cp redis.conf c_replica.confIn
a_master.conf, add the following lines to the end of the file, replacing192.0.2.1with the IP address of your Linode.- File: ~/redis-stable/a_master.conf
1
2
3
4
5
6
7
bind 127.0.0.1 192.0.2.1 protected-mode no port 6379 pidfile /var/run/redis_6379.pid cluster-enabled yes cluster-config-file nodes-6379.conf cluster-node-timeout 15000
Important Without taking additional precautions, your Redis nodes may be exposed to the public internet via their respective public IP addresses. This means your nodes may be vulnerable to automated attacks. For more information, see Redis Security.
To protect your Redis cluster from outside threats, consider utilizing Cloud Firewalls or VLANs to limit access to your cluster Linodes.
When using VLANs, replace
192.0.2.1with the respective Linode’s IPAM address in each configuration file.In
c_replica.conf, the configuration is similar except for an update of the port number.redis-cliwill be used later to configure this into a replica for the appropriate master.- File: ~/redis-stable/c_replica.conf
1
2
3
4
5
6
7
bind 127.0.0.1 192.0.2.1 protected-mode no port 6381 pidfile /var/run/redis_6381.pid cluster-enabled yes cluster-config-file nodes-6381.conf cluster-node-timeout 15000
Repeat this process across the remaining two Linodes, taking care to specify the port numbers for all master-replica pairs. The ports in this guide range from 6379 to 6381.
Server Master Master Filename Replica Replica Filename 1 6379 a_master.conf 6381 c_replica.conf 2 6380 b_master.conf 6379 a_replica.conf 3 6381 c_master.conf 6380 b_replica.conf Note Each node in the Redis cluster requires that the defined port the port plus 10000 are open. For example, Server 1 must have TCP ports 6379 and 16379 open for the master node, and TCP ports 6381 and 16381 open for the replica node. Ensure iptables or ufw is configured properly for each server.
Connect Redis Master and Replicas
Master-replica replication can be achieved across three nodes by running two instances of a Redis server on each node.
SSH into Server 1 and start the two Redis instances, preferably in separate
tmuxor using another method that allows the instances to persist after you disconnect from the Linode.redis-server ~/redis-stable/a_master.conf redis-server ~/redis-stable/c_replica.confSubstitute
a_master.confandc_replica.confwith the appropriate configuration files for the remaining two servers. All the nodes should be starting in cluster mode.. _._ _.-``__ ''-._ _.-`` `. `_. ''-._ Redis 6.2.3 (00000000/0) 64 bit .-`` .-```. ```\/ _.,_ ''-._ ( ' , .-` | `, ) Running in cluster mode |`-._`-...-` __...-.``-._|'` _.-'| Port: 6379 | `-._ `._ / _.-' | PID: 26533 `-._ `-._ `-./ _.-' _.-' |`-._`-._ `-.__.-' _.-'_.-'| | `-._`-._ _.-'_.-' | https://redis.io `-._ `-._`-.__.-'_.-' _.-' |`-._`-._ `-.__.-' _.-'_.-'| | `-._`-._ _.-'_.-' | `-._ `-._`-.__.-'_.-' _.-' `-._ `-.__.-' _.-' `-._ _.-' `-.__.-'
Create a Redis Cluster Using redis-cli
At this point, each Linode hosts two independent master nodes. The Redis installation comes with a redis-cli tool to set up and manage your cluster.
SSH into Server 1, then create a Redis cluster consisting of your three master nodes with the following command:
Note If utilizing a VLAN, use each Linode’s IPAM address.redis-cli --cluster create \ $SERVER_1_IP_ADDRESS:6379 \ $SERVER_2_IP_ADDRESS:6380 \ $SERVER_3_IP_ADDRESS:6381Accept the configuration with three masters. Successful set up of the cluster will return the following message:
>>>Creating cluster
>>>Performing hash slots allocation on 3 nodes...
Can I set the above configuration? (type 'yes' to accept): yes
>>> Nodes configuration updated
>>> Assign a different config epoch to each node
>>> Sending CLUSTER MEET messages to join the cluster
Waiting for the cluster to join.
[OK] All nodes agree about slots configuration.
>>> Check for open slots...
>>> Check slots coverage...
[OK] All 16384 slots covered.
See all the current nodes connected to the cluster by using the
redis-clitool. The-cflag specifies the connection to the cluster.redis-cli cluster nodesThis returns a list of nodes currently in the cluster identified by their ID and replicas, if any exist.
Add Redis Cluster Replicas
The redis-cli tool can also be used to add new nodes to the cluster. Using redis-cli, you can manually attach the remaining replica nodes to their respective master nodes.
Add replica node “C” on Server 1 to the cluster and connect it to master node “C” on Server 3 with the following command, using the ID of master node “c” from the
redis-cli cluster nodescommand:redis-cli --cluster add-node \ $SERVER_1_IP_ADDRESS:6381 \ $SERVER_3_IP_ADDRESS:6381 \ --cluster-slave \ --cluster-master-id $MASTER_ID_CThe resulting output should be:
>>> Adding node $SERVER_1_IP_ADDRESS:6381 to cluster $SERVER_3_IP_ADDRESS:6381
>>> Performing Cluster Check (using node $SERVER_3_IP_ADDRESS:6381)
M: $MASTER_ID_C $SERVER_3_IP_ADDRESS:6381
   slots:10923-16383 (5461 slots) master
M: $MASTER_ID_A $SERVER_1_IP_ADDRESS:6379
   slots:0-5460 (5461 slots) master
M: $MASTER_ID_B $SERVER_2_IP_ADDRESS:6380
   slots:5461-10922 (5462 slots) master
[OK] All nodes agree about slots configuration.
>>> Check for open slots...
>>> Check slots coverage...
[OK] All 16384 slots covered.
>>> Send CLUSTER MEET to node $SERVER_1_IP_ADDRESS:6381 to make it join the cluster.
Waiting for the cluster to join

>>> Configure node as replica of $SERVER_3_IP_ADDRESS:6381.
Repeat for the remaining two nodes.
redis-cli --cluster add-node \
  $SERVER_2_IP_ADDRESS:6379 \
  $SERVER_1_IP_ADDRESS:6379 \
  --cluster-slave \
  --cluster-master-id $MASTER_ID_A

redis-cli --cluster add-node \
  $SERVER_3_IP_ADDRESS:6380 \
  $SERVER_2_IP_ADDRESS:6380 \
  --cluster-slave \
  --cluster-master-id $MASTER_ID_B
Add Key-Value Pairs and Sharding
The command line interface offers a way to SET and GET keys, in addition to returning information about the cluster. On your local computer, you can connect to any of the master nodes and explore some properties of a Redis cluster.
Repeat the installation of Redis on your local computer if needed. Check the firewall settings to allow communicating with the master nodes.
redis-cli -c -h $SERVER_1_IP_ADDRESS -p 6379Use the
CLUSTER INFOcommand to see information about the state of the cluster such as size, hash slots, and failures, if any.$SERVER_1_IP_ADDRESS:6379>CLUSTER INFO cluster_state:ok cluster_slots_assigned:16384 cluster_slots_ok:16384 cluster_slots_pfail:0 cluster_slots_fail:0 cluster_known_nodes:6 cluster_size:3 cluster_current_epoch:6 cluster_my_epoch:1 cluster_stats_messages_ping_sent:8375 cluster_stats_messages_pong_sent:9028 cluster_stats_messages_meet_sent:1 cluster_stats_messages_sent:17404 cluster_stats_messages_ping_received:9022 cluster_stats_messages_pong_received:8376 cluster_stats_messages_meet_received:6 cluster_stats_messages_received:17404To check master-replica replication,
INFO replicationreturns information about the replica.$SERVER_1_IP_ADDRESS:6379>INFO replication role:master connected_slaves:1 slave0:ip=$SERVER_1_IP_ADDRESS,port=6381,state=online,offset=213355,lag=1 master_replid:cd2e27cba094f2e7ed38b0313dcd6a979ab29b7a master_replid2:0000000000000000000000000000000000000000 master_repl_offset:213355 second_repl_offset:-1 repl_backlog_active:1 repl_backlog_size:1048576 repl_backlog_first_byte_offset:197313 repl_backlog_histlen:16043To demonstrate sharding, you can set a few examples of key-value pairs. Setting a key will redirect the value to a hash slot among the three master nodes.
$SERVER_1_IP_ADDRESS:6379> SET John Adams
-> Redirected to slot [6852] located at $SERVER_2_IP_ADDRESS:6380
OK
$SERVER_2_IP_ADDRESS:6380> SET James Madison
-> Redirected to slot [2237] located at $SERVER_1_IP_ADDRESS:6379
OK
$SERVER_1_IP_ADDRESS:6379> SET Andrew Jackson
-> Redirected to slot [15768] located at $SERVER_3_IP_ADDRESS:6381
OK
$SERVER_3_IP_ADDRESS:6381> GET John
-> Redirected to slot [6852] located at $SERVER_2_IP_ADDRESS:6380
"Adams"
$SERVER_2_IP_ADDRESS:6380>
Promote a Redis Replica to Master
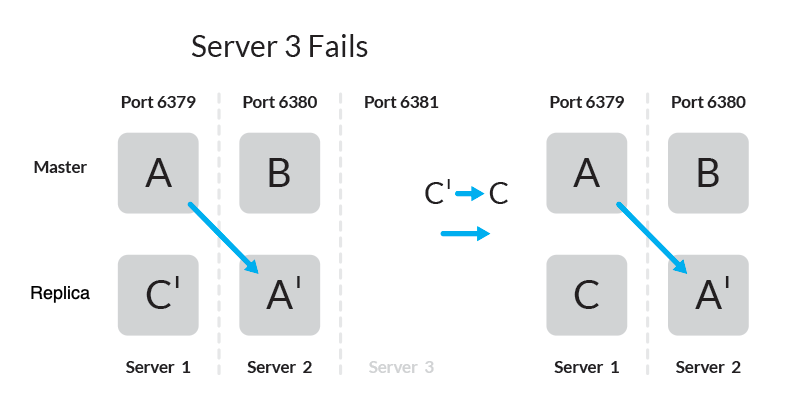
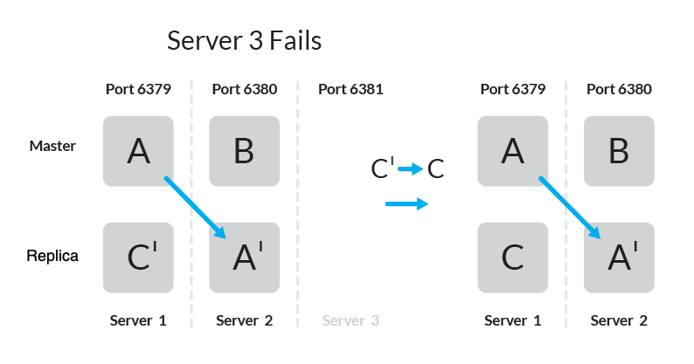
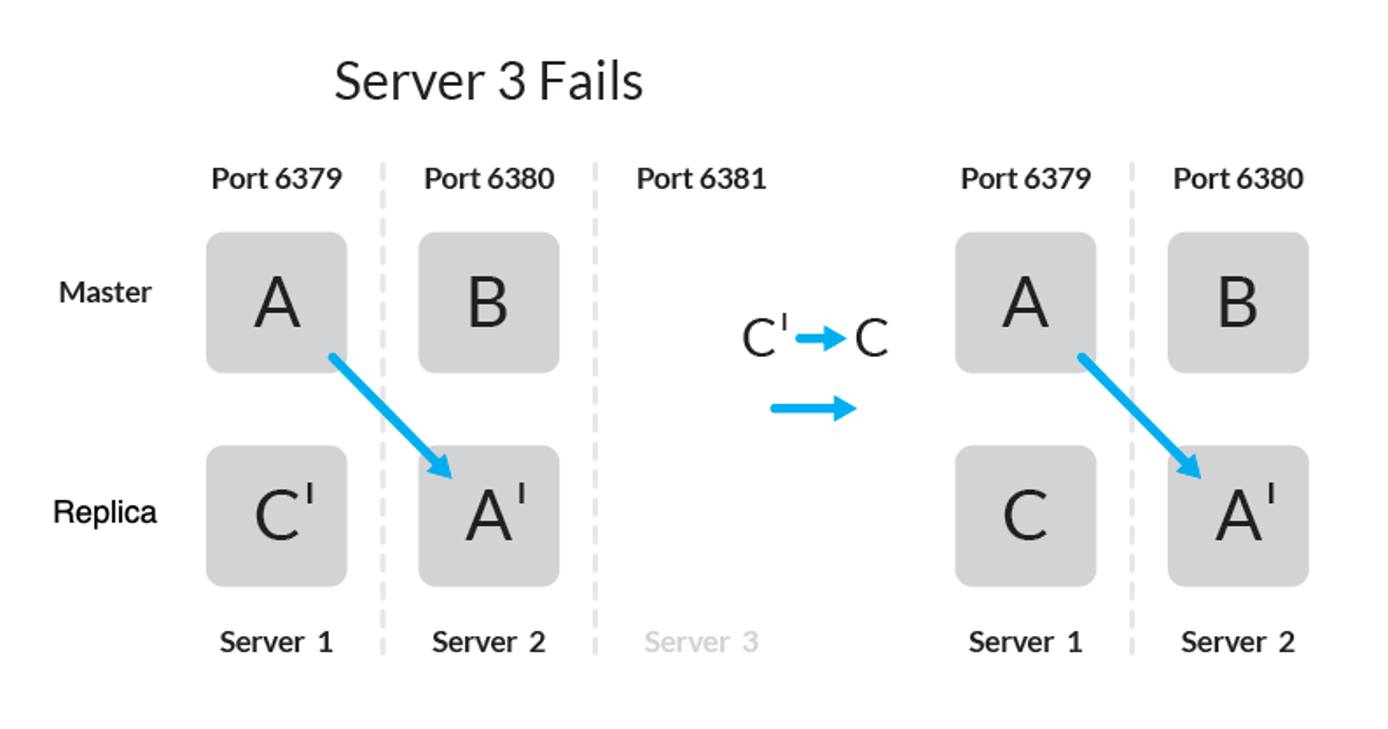
Based on the current topology, the cluster will remain online if one of the Linodes fails. At that point, you can expect a replica to promote into a master with the data replicated.

Add a key value pair.
$SERVER_1_IP_ADDRESS:6379> SET foo bar
-> Redirected to slot [12182] located at $SERVER_3_IP_ADDRESS:6381
OK
$SERVER_3_IP_ADDRESS:6381> GET foo
"bar"
The key
foois added to a master on Server 3 and replicated to a replica on Server 1.In the event Server 3 is down, the replica on Server 1 will become a master and the cluster will remain online.
$SERVER_1_IP_ADDRESS:6379> CLUSTER NODES
$REPLICA_ID_B $SERVER_3_IP_ADDRESS:6380@16380 slave,fail $MASTER_ID_B 1502722149010 1502722147000 6 connected
$REPLICA_ID_B $SERVER_2_IP_ADDRESS:6379@16379 slave $MASTER_ID_A 0 1502722242000 5 connected
$REPLICA_ID_C_PROMOTED $SERVER_1_IP_ADDRESS:6381@16381 master - 0 1502722241651 7 connected 10923-16383
$MASTER_ID_B $SERVER_2_IP_ADDRESS:6380@16380 master - 0 1502722242654 2 connected 5461-10922
$MASTER_ID_C $SERVER_3_IP_ADDRESS:6381@16381 master,fail - 1502722149010 1502722145402 3 connected
$MASTER_ID_A $SERVER_1_IP_ADDRESS:6379@16379 myself,master - 0 1502722241000 1 connected 0-5460
A key that was previously located in a hash slot on Server 3, the key value pair is now stored on Server 1.
$SERVER_1_IP_ADDRESS:6379> GET foo
-> Redirected to slot [12182] located at $SERVER_1_IP_ADDRESS:6381
"bar"
Remember to ensure firewall settings are adequate for all Redis instances. There is supplemental functionality, such as adding additional nodes, creating multiple replicas, or resharding, which are beyond the scope of this document. For more guidance, consult the official Redis documentation for how to implement these features.
More Information
You may wish to consult the following resources for additional information on this topic. While these are provided in the hope that they will be useful, please note that we cannot vouch for the accuracy or timeliness of externally hosted materials.
This page was originally published on
