Product docs and API reference are now on Akamai TechDocs.
Search product docs.
Search for “” in product docs.
Search API reference.
Search for “” in API reference.
Search Results
results matching
results
No Results
Filters
Configuring Nagios Alerts on Debian 10 and Ubuntu 20.04
Traducciones al EspañolEstamos traduciendo nuestros guías y tutoriales al Español. Es posible que usted esté viendo una traducción generada automáticamente. Estamos trabajando con traductores profesionales para verificar las traducciones de nuestro sitio web. Este proyecto es un trabajo en curso.
Nagios, a popular tool for monitoring servers, comes with a robust web interface to help you effectively manage your server. Its dashboard makes it relatively easy to check in on the hosts and services running on your machine and quickly learn of any issues.
However, you can get even more out of Nagios by setting it up to deliver alerts and notifications when you need them. This guide provides instructions for setting up email alerts from Nagios and configuring regular status updates via Internet Relay Chat (IRC).
Before You Begin
If you have not already done so, create a Linode account and Compute Instance. See our Getting Started with Linode and Creating a Compute Instance guides.
Follow our Setting Up and Securing a Compute Instance guide to update your system. You may also wish to set the timezone, configure your hostname, create a limited user account, and harden SSH access.
Install and configure Nagios. Follow the steps in the Install Nagios on Debian 10 and Ubuntu 20.04 guide. Alternatively, the official Nagios Installation Guide provides steps for installing Nagios from source code on a wide range of Linux distributions.
Replace
example.comthroughout this guide with your machine’s domain name, and replacefqdn.example.comwith your machine’s fully qualified domain name (FQDN).
sudo. If you’re not familiar with the sudo command, see the Linux Users and Groups guide.Set Up Nagios Email Alerts
Install Email Services
Install packages for handling emails.
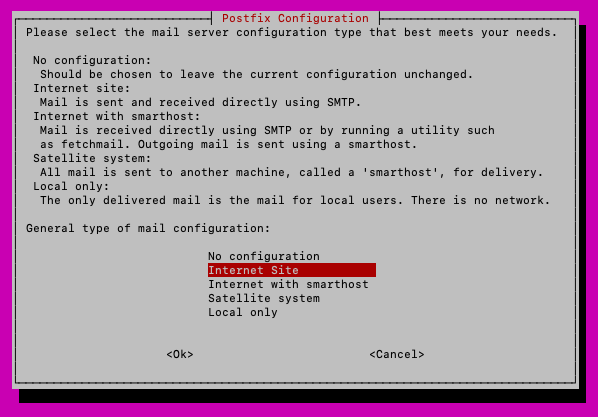
sudo apt install mailutils postfixYou should be prompted for information about your mail server configuration. If you are not or if you need to re-enter the information, you can run the following command after the installation has finished:
sudo dpkg-reconfigure postfixSelect Internet Site from the options that appear.

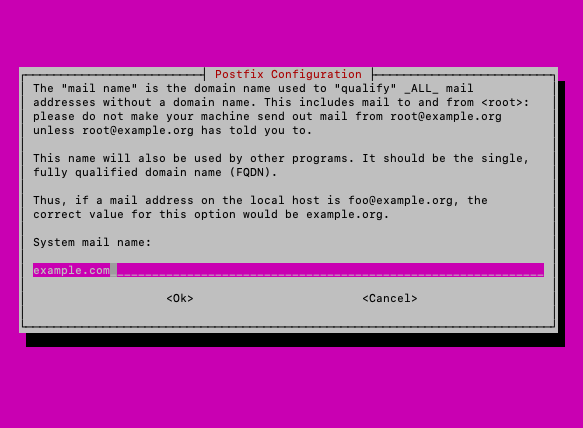
- Enter the domain name to be used for your email addresses. This may be either your machine’s fully qualified domain name (FQDN) or base domain name. It can be
localhostif you are configuring Postfix for local emails only.

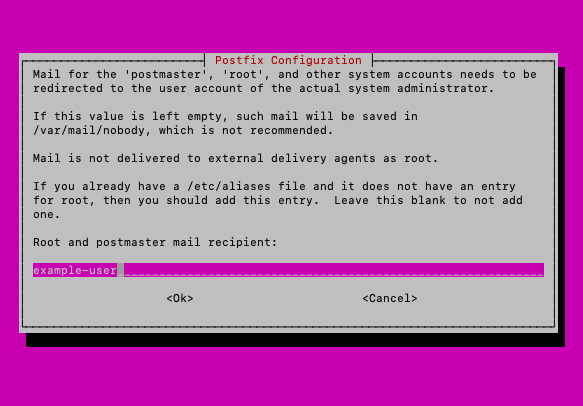
- Provide the username of your primary user on the machine.

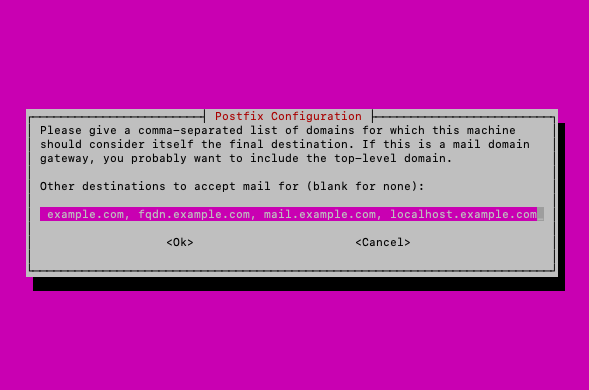
- When prompted for destinations for which to accept mail, you can leave the field blank to only accept emails directed to the system mail name. If you have a domain name configured and want to ensure that emails are accepted for a wider range of domains, you can enter the following:
localhost, example.com, fqdn.example.com, mail.example.com, localhost.example.com.

Use the default values for the remaining steps:
- Choose No to synchronous updates
- Enter
127.0.0.0/8 [::ffff:127.0.0.0]/104 [::1]/128for local network 0for the mailbox limit+for the local inbox extension character- Select all for the Internet protocols
Alternatively, you can follow the Configure Postfix to Send Email Using External SMTP Servers or the Configure Postfix to Send Mail Using Gmail and Google Apps on Debian or Ubuntu guide. Doing so sets up Postfix to send emails via an external SMTP provider or a Gmail account, respectively.
Test the email configuration with the following command below; replace
example-userwith the username of a local user that you can log in as.echo "Body of the test email." | mail -s "Test Email" example-user@localhostLog in as
example-user, and run themailcommand. Verify that the user received the test email.You can use a similar command to the one above to test outbound emails. Replace
example-user@localhostwith an external email address to which you have access.
Configure Nagios
Using your preferred text editor, open the Nagios commands configuration file, located at
/etc/nagios4/objects/commands.cfg. Identify the command definitions fornotify-host-by-emailandnotify-service-by-email. For each, verify that the location of themailbinary is/usr/bin/mail, as in the following example:- File: /etc/nagios4/objects/commands.cfg
 1
 2
 3
 4
 5
 6
 7
 8
 9
10
11
12
13
14
# 'notify-host-by-email' command definition define command{ command_name notify-host-by-email command_line /usr/bin/printf "%b" "***** Nagios *****\n\nNotification Type: $NOTIFICATIONTYPE$\nHost: $HOSTNAME$\nState: $HOSTSTATE$\nAddress: $HOSTADDRESS$\nInfo: $HOSTOUTPUT$\n\nDate/Time: $LONGDATETIME$\n" | /usr/bin/mail -s "** $NOTIFICATIONTYPE$ Host Alert: $HOSTNAME$ is $HOSTSTATE$ **" $CONTACTEMAIL$ } # 'notify-service-by-email' command definition define command{ command_name notify-service-by-email command_line /usr/bin/printf "%b" "***** Nagios *****\n\nNotification Type: $NOTIFICATIONTYPE$\n\nService: $SERVICEDESC$\nHost: $HOSTALIAS$\nAddress: $HOSTADDRESS$\nState: $SERVICESTATE$\n\nDate/Time: $LONGDATETIME$\n\nAdditional Info:\n\n$SERVICEOUTPUT$\n" | /usr/bin/mail -s "** $NOTIFICATIONTYPE$ Service Alert: $HOSTALIAS$/$SERVICEDESC$ is $SERVICESTATE$ **" $CONTACTEMAIL$ }
Open the Nagios
contacts.cfgconfiguration file, located at/etc/nagios4/objects/contacts.cfg. Identify thenagiosadmincontact definition. In the email field, enter the email address where you would like to receive Nagios notifications.You can configure Nagios to send notifications to a local mailbox using
example-user@localhost, whereexample-useris the local user you want to receive Nagios alerts.Open the Nagios
templates.cfgconfiguration file, located at/etc/nagios/objects/templates.cfg. Find thegeneric-hostdefinition, and ensure that it has the following line:- File: /etc/nagios4/objects/templates.cfg
1
2
contact_groups admins
Similarly, find the
generic-servicedefinition, and ensure that the same line is present.Restart the Nagios service.
sudo systemctl restart nagios4
Test Nagios Email Alerts
You can use the following steps to verify that Nagios is delivering alerts by email.
In a web browser, navigate to your Nagios interface, and log in as the
nagiosadminuser.Select Services from the menu on the left, and select any of the services for which notifications are not disabled.
Choose the Send custom service notification option from the Service Commands menu on the right. Enter a comment, and select Commit.
Check the email inbox that you configured Nagios to send notifications to, and verify that you received your custom notification.
If your Nagios alerts are sent to a local user, log in as that user, and use the
mailcommand to check the user’s inbox.
Set Up Nagios IRC Alerts
This guide uses NagIRCBot, an application designed to routinely read Nagios’s status information and post updates to an Internet Relay Chat (IRC) channel.
Build and Install NagIRCBot
Install the requisites for building NagIRCBot.
sudo apt-get install -y autoconf gcc libc6 libmcrypt-dev make libssl-dev wget bc gawk dc build-essential snmp libnet-snmp-perl gettextNavigate to the NagIRCBot Exchange directory. Replace the version number in the following examples with the version you find.
In the
/optdirectory, download the package containing the files needed to build the bot; extract the files, and change them into the resulting directory.cd /opt sudo wget https://launchpad.net/ubuntu/+archive/primary/+sourcefiles/nagircbot/0.0.33-2/nagircbot_0.0.33.orig.tar.gz sudo tar -zxvf nagircbot_0.0.33.orig.tar.gz cd nagircbot-0.0.33 sudo make sudo make install sudo cp nagircbot /usr/local/binBuild the NagIRCBot application.
 sudo make
 sudo make install
Run and Test NagIRCBot
Use a version of the following command to start NagIRCBot.
sudo nagircbot -f /var/lib/nagios4/status.dat -s irc.example.com:6667 -c \#example-channel -C -n nagircbot -u nagircbot-username -U NagIRCBot-Name -I 900Replace
irc.example.comwith the hostname of the IRC network orlocalhostfor a local IRC network. Replacenagircbot,nagircbot-username, andNagIRCBot-Namewith the nickname, username, and real name, respectively, to be used for the bot. Change the900as needed; it defines how frequently, in seconds, the bot checks and sends Nagios status information.Connect to the IRC channel, and verify that you are receiving status updates at the expected interval.
By default, NagIRCBot must be re-initiated using the command described above after each system reboot. Refer to the Use systemd to Start a Linux Service at Boot or the Schedule Tasks with Cron guide for instructions on how to schedule tasks to run automatically.
More Information
You may wish to consult the following resources for additional information on this topic. While these are provided in the hope that they will be useful, please note that we cannot vouch for the accuracy or timeliness of externally hosted materials.
This page was originally published on
