How to Expose Services with the Nginx Proxy Manager
Traducciones al EspañolEstamos traduciendo nuestros guías y tutoriales al Español. Es posible que usted esté viendo una traducción generada automáticamente. Estamos trabajando con traductores profesionales para verificar las traducciones de nuestro sitio web. Este proyecto es un trabajo en curso.
The Nginx Proxy Manager offers a convenient tool for managing proxy hosting. The proxy manager makes it relatively easy to forward traffic to your services, whether running on the cloud or your home network.
This tutorial introduces the Nginx Proxy Manager and illustrates how to start using it. Learn how to install the Nginx Proxy Manager and use it to set up proxy hosts for your own services.
Before You Begin
If you have not already done so, create a Linode account and Compute Instance. See our Getting Started with Linode and Creating a Compute Instance guides.
Follow our Setting Up and Securing a Compute Instance guide to update your system. You may also wish to set the timezone, configure your hostname, create a limited user account, and harden SSH access.
sudo. If you’re not familiar with the sudo command, see the Users and Groups guide.What Is the Nginx Proxy Manager?
The Nginx Proxy Manager allows you to create and manage proxy hosts.
With a traditional Nginx setup, creating and maintaining proxies can be time consuming, and sometimes more effort than it’s worth. The Nginx Proxy Manager takes all of the steps involved and packages them into a convenient web interface. Once your services are running, you can easily create a proxy host within the Nginx Proxy Manager to forward traffic according to your specifications.
However, the Nginx Proxy Manager may not be well-suited to more advanced use cases. For instance, the proxy manager does not have load balancing and other more advanced features of standard Nginx.
Nevertheless, the proxy manager can significantly help with many web service setups. It is especially useful for deploying proxies for services running on premise. The proxy manager can also be beneficial for administrator services, offering server-monitoring tools and website administration interfaces.
For most cases, the Nginx Proxy Manager’s convenience and ease of use make it a compelling solution.
How to Run the Nginx Proxy Manager
The Nginx Proxy Manager provides access to a dashboard for managing proxy services. The setup is relatively straightforward. Once the Nginx Proxy Manager is running, everything else is covered within the manager’s web interface.
Follow along to get an Nginx Proxy Manager instance up and running.
Installing Docker and Docker Compose
Docker Compose is the recommended method for running the Nginx Proxy Manager. To begin, install Docker and the Docker Compose plugin on your system.
This tutorial covers the steps required for Debian and Ubuntu as well as AlmaLinux, CentOS Stream, Fedora, and Rocky Linux systems. For other operating systems and distributions, refer to the official instructions for installing Docker Engine.
Debian and Ubuntu
Remove any existing Docker installations:
sudo apt remove docker docker-engine docker.io containerd runcInstall the prerequisite packages for adding the Docker repository to the APT package manager:
sudo apt install ca-certificates curl gnupg lsb-releaseAdd the GPG key for the Docker repository for your distribution to the APT package manager:
Debiansudo mkdir -m 0755 -p /etc/apt/keyrings curl -fsSL https://download.docker.com/linux/debian/gpg | sudo gpg --dearmor -o /etc/apt/keyrings/docker.gpgUbuntusudo mkdir -m 0755 -p /etc/apt/keyrings curl -fsSL https://download.docker.com/linux/ubuntu/gpg | sudo gpg --dearmor -o /etc/apt/keyrings/docker.gpgAdd the Docker repository for your distribution to the APT package manager:
Debianecho "deb [arch=$(dpkg --print-architecture) signed-by=/etc/apt/keyrings/docker.gpg] https://download.docker.com/linux/debian $(lsb_release -cs) stable" | sudo tee /etc/apt/sources.list.d/docker.list > /dev/nullUbuntuecho "deb [arch=$(dpkg --print-architecture) signed-by=/etc/apt/keyrings/docker.gpg] https://download.docker.com/linux/ubuntu $(lsb_release -cs) stable" | sudo tee /etc/apt/sources.list.d/docker.list > /dev/nullUpdate the APT indices, then install the Docker Engine along with the Docker Compose plugin:
sudo apt update
sudo apt install docker-ce docker-ce-cli containerd.io docker-buildx-plugin docker-compose-plugin
AlmaLinux, CentOS Stream, Fedora, and Rocky Linux
Remove any existing Docker installations:
sudo dnf remove docker docker-client docker-client-latest docker-common docker-latest docker-latest-logrotate docker-logrotate docker-selinux docker-engine-selinux docker-engineInstall the core plugins for the DNF package manager. These provide access to tools for managing DNF repositories.
sudo dnf -y install dnf-plugins-coreAdd the Docker repository for your distribution to the DNF package manager:
AlmaLinux, CentOS Stream, and Rocky Linuxsudo dnf config-manager --add-repo https://download.docker.com/linux/centos/docker-ce.repoFedorasudo dnf config-manager --add-repo https://download.docker.com/linux/fedora/docker-ce.repoInstall the Docker Engine along with the Docker Compose plugin:
sudo dnf install docker-ce docker-ce-cli containerd.io docker-buildx-plugin docker-compose-pluginIf prompted to verify the GPG key, you should see the following key listed:
060A 61C5 1B55 8A7F 742B 77AA C52F EB6B 621E 9F35
Once installed, ensure that the Docker daemon is running:
sudo systemctl status docker● docker.service - Docker Application Container Engine
Loaded: loaded (/usr/lib/systemd/system/docker.service; enabled; vendor preset: disabled)
Active: active (running) since Thu 2023-02-16 20:38:07 UTC; 1s ago
Docs: https://docs.docker.comIf it is not running (active), enable and start the Docker daemon with the following commands:
sudo systemctl enable docker
sudo systemctl start docker
Running the Nginx Proxy Manager
With the prerequisites in place, start up the Nginx Proxy Manager. This calls for deploying a Docker Compose configuration, which is provided in the steps below.
First, create a directory for the Nginx Proxy Manager’s Docker Compose files, and change into that directory. This tutorial uses the directory
~/nginx-proxy-manager/, and the remaining steps assume you are working out of this directory.mkdir ~/nginx-proxy-manager/ cd ~/nginx-proxy-manager/Create a
docker-compose.ymlfile within the directory:nano docker-compose.ymlGive the file the following contents:
- File: docker-compose.yml
1 2 3 4 5 6 7 8 9 10 11 12 13 14 15 16 17 18 19 20version: "3" networks: proxiable: name: proxiable services: app: image: 'jc21/nginx-proxy-manager:latest' container_name: nginxproxymanager restart: unless-stopped volumes: - ./data:/data - ./letsencrypt:/etc/letsencrypt ports: - '80:80' - '443:443' - '81:81' networks: - proxiable
Note The Nginx Proxy Manager additionally supports configurations for working with MySQL/MariaDB. This tutorial does not employ these, but you can see the setup in the official instructions.When done, press CTRL+X, followed by Y then Enter to save the file and exit
nano.Start up the Nginx Proxy Manager via Docker Compose:
sudo docker compose up -d
The Docker Compose configuration above contains an optional feature. The proxiable network allows you to run the Nginx Proxy Manager within the same Docker network as other services. This gives you the option of easy and secure communications between the proxy manager and your Docker services.
The example Grafana setup in the How to Expose a Service through the Nginx Proxy Manager section later in this guide leverages this feature. See the included Docker Compose configuration for how the network is included in the service.
Accessing the Nginx Proxy Manager Interface
The Nginx Proxy Manager can now accessible. Open a web browser and navigate to port 81 on the public IP address of the system that the proxy manager is running on.
For example, if you are running the Nginx Proxy Manager on a machine with a public IP address of 192.0.2.0, you would navigate to 192.0.2.0:81.
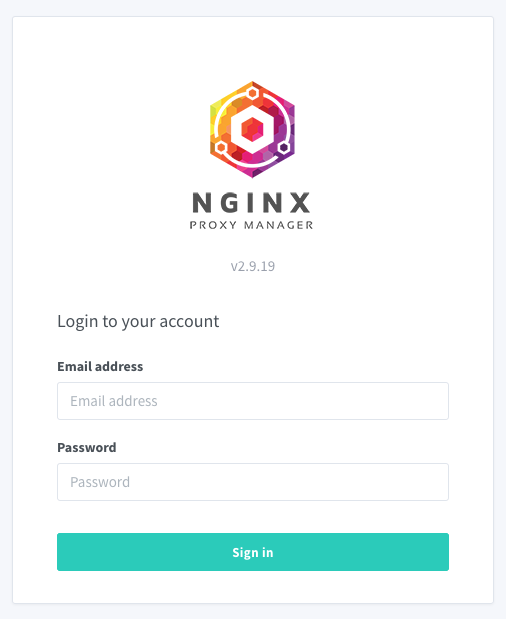
The Nginx Proxy Manager login screen should appear:

The setup creates a default administrator user with the following initial credentials, which the system prompts you to change after logging in:
- Username:
admin@example.com - Password:
changeme
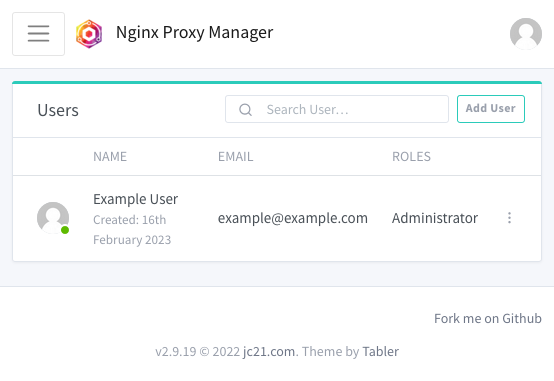
After logging in and updating the credentials for the administrator user, you are directed to the Nginx Proxy Manager dashboard. You can utilize the proxy manager’s features from this interface. The next section of the tutorial shows how to get started.

How to Expose a Service through the Nginx Proxy Manager
To see what the Nginx Proxy Manager is capable of, set it up as a reverse proxy for a service.
This tutorial structures its example around a Grafana monitoring service deployed with Docker Compose. However, if you already have your own service, you can easily use that in place of the Grafana service.
The demonstration here leverages useful features of the Nginx Proxy Manager. First, it uses a shared Docker network between the proxy manager service and the Grafana service to make connections easier and more secure. Second, it sets up a reverse proxy for the proxy manager’s own interface, providing more convenient and secure access to it.
Creating the DNS Records
You must create at least one DNS record for a domain name to proxy your service to. The rest of this tutorial uses example.com as the domain, replace that in the example commands with your actual domain name.
While Linode does not provide domain name registration, you can use the Linode DNS manager to manage DNS records for a domain name. Refer to our guide DNS Manager - Get Started for details on these steps if you are using the Linode DNS Manager.
The rest of this tutorial assumes that you have done the following:
Register a domain name. This can be done through the services listed in the guide linked above or through any other registrar service.
If using the Linode DNS Manager, insert the Linode name servers in your registrar’s interface.
Create an A/AAAA DNS record pointing the domain to the public IP address for the instance running your service.
Optional: To follow along with setting up a reverse proxy for the Nginx Proxy Manager interface, create a separate A/AAAA record pointing to the same IP address.
This tutorial uses a subdomain of
proxy-managerfor the additional record. Add this by creating a new A/AAAA record from the Domains page and enteringproxy-manageras the Hostname in the Linode DNS Manager.
Setting Up a Service
The Nginx Proxy Manager can work well with a wide range of services, but it excels with services deployed via Docker.
To demonstrate, this tutorial provides a Docker Compose configuration to deploy the Grafana service. The deployment includes Prometheus and comes ready to monitor the performance of your server.
First, download the archive containing all the configuration files here: prometheus-grafana-compose.zip. Then, follow along with the following steps to start up the Grafana and accompanying services:
Unzip the archive and change into the resulting directory. This assumes you are in the directory where you downloaded the archive. You may also need to install the
unzippackage to complete this step.unzip prometheus-grafana-compose.zip cd prometheus-grafana-composeThe remaining steps assume you are working within the unzipped
prometheus-grafana-composedirectory.Open the
docker-compose.ymlfile:nano docker-compose.ymlThe file contains variables for administrator credentials in the
grafanasection:GF_SECURITY_ADMIN_USERandGF_SECURITY_ADMIN_PASSWORD. Adjust these variable’s values to fit your needs.Note For higher security, you can use environment variables to store the actual credentials.
For instance, give the variables values of
${GRAFANA_ADMIN_USER}and${GRAFANA_ADMIN_PASSWORD}, respectively. Then, set the corresponding environment variables before running thedocker compose upcommand below.GRAFANA_ADMIN_USER=admin GRAFANA_ADMIN_PASSWORD=adminpassWhen done, save the file and close
nano.Optional: You can add the JSON for any Grafana dashboards to the
grafana/provisioning/dashboards/directory. The Node Exporter Full provides a good dashboard to start with, and it works with the setup in this tutorial.Run the Docker Compose setup:
sudo docker compose up -d
Configuring the Nginx Proxy Manager
With your service running, return to the Nginx Proxy Manager interface. There, add a proxy host for the service, creating a reverse proxy that forwards traffic from the domain to the service.
Access the Nginx Proxy Manager interface as previously shown in the Accessing the Nginx Proxy Manager Interface section.
Navigate to the Proxy Hosts page. Get there either using the Proxy Hosts button from the Dashboard or via the Hosts > Proxy Hosts option from the top menu bar.
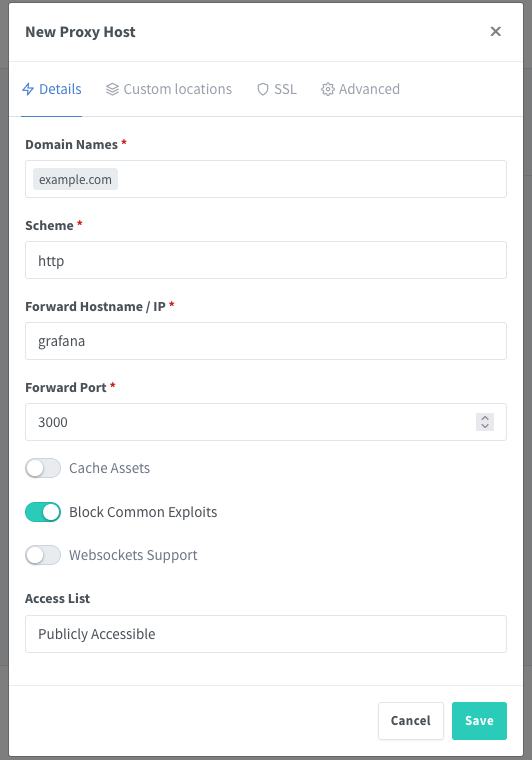
Click the Add Proxy Host button. Complete the form that displays as follows:
Enter the domain name to be used for your service in the Domain Names field.
Leave the Scheme as http. This refers to the scheme used by Nginx to access the service, not the scheme used for the proxy itself. A later step adds SSL encryption to the proxy.
Enter the service address in the Forward Hostname/IP field.
Using the configuration provided in this tutorial, the Grafana service runs in the same Docker network as the Nginx Proxy Service. To leverage that, simply enter the Docker container name
grafanaas the hostname.Otherwise, you would enter the local or public IP address from which the proxy manager could access the service.
Enter the service port in the Forward Port field. Following the configuration for Grafana used in this tutorial, that port is
3000.Toggle on the Block Common Exploits option as this is generally a nice feature to have.
Leave the remaining fields at their defaults.

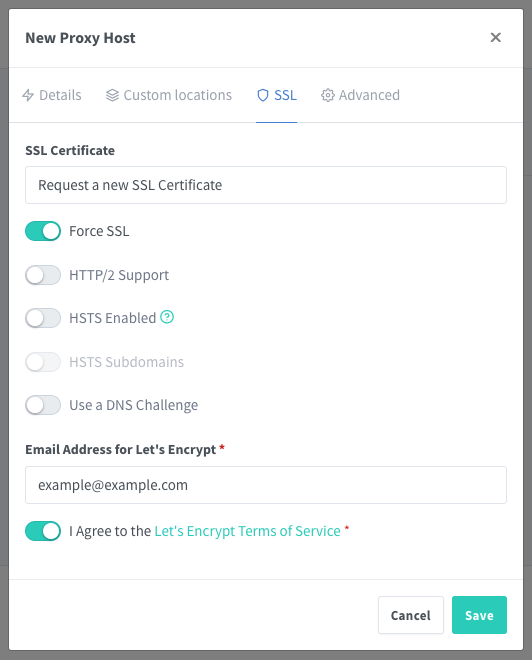
Before saving the configuration, navigate to the SSL tab and complete the form as follows:
Select Request a new SSL Certificate from the SSL Certificate drop down.
Toggle on the Force SSL option to ensure HTTPS is used, encrypting traffic to and from the service.
Enter an email address for the Let’s Encrypt certificate process. Let’s Encrypt uses this to alert you when the certificate needs to be renewed.
Select the I Agree toggle after reading the terms of service for Let’s Encrypt.
Leave the remaining fields at their defaults.

Select Save to complete the proxy host setup.
Your reverse proxy for the Grafana service is now in place. Continue on to the next section to see it in action.
Optional: You can also add a reverse proxy for the Nginx Proxy Manager interface itself. To to so, follow nearly the exact same steps outlined above for the Grafana service, with only these differences:
Enter the subdomain (or other domain name) you set up for the Nginx Proxy Manager. The example above suggested using the
proxy-managersubdomain, so if your Grafana domain wasexample.com, you would enterproxy-manager.example.com.Enter
nginxproxymanageras the Forward Hostname/IP, assuming you retained the container name in the Nginx Proxy Manager setup above, and enter81as the Forward Port.Create a new SSL certificate. The Nginx Proxy Manager provides the option of using the same SSL certificate as created for Grafana in the steps above. However, since the domain names are different, some browsers would throw an obstructing warning if you used the same certificate.
Accessing the Service
You can now access your service through your domain name, leveraging SSL encryption.
In a web browser, navigate to the HTTPS address for your domain. For instance, if your domain name is example.com, navigate to https://example.com/.
There, you should be greeted with the Grafana login screen. Use the credentials that you configured in the Grafana docker-compose.yml file from above to log in.

Similarly, you can now use the subdomain (or other domain) that you configured for navigating to the Nginx Proxy Manager interface. Using the examples given above, this would be located at https://proxy-manager.example.com.
Conclusion
This covers everything needed to start using the Nginx Proxy Manager for your web services. Check out the links below for more information about advanced setups within the proxy manager. However, most use cases for the Nginx Proxy Manager can be covered with the steps in this tutorial. This only showcases how effectively the proxy manager can simplify reverse proxy setups.
More Information
You may wish to consult the following resources for additional information on this topic. While these are provided in the hope that they will be useful, please note that we cannot vouch for the accuracy or timeliness of externally hosted materials.
This page was originally published on
