
Enterprise-capable open source VPN.
User-friendly VPN for both individual and commercial use. Choose from three simple pricing plans to find the exact features you need, from a free single server to unlimited servers on the Enterprise plan. Paid plans include port forwarding, failover gateway links, and the ability to send user keys via email.
Deploying the Pritunl Marketplace App
The Linode Marketplace allows you to easily deploy software on a Linode using the Linode Cloud Manager.
- Log in to the Cloud Manager and select the Marketplace link from the left navigation menu. This displays the Linode Compute Create page with the Marketplace tab pre-selected.
- Under the Select App section, select the app you would like to deploy.
- Fill out all required Options for the selected app as well as any desired Advanced Options (which are optional). See the Configuration Options section for details.
- Complete the rest of the form as discussed within the Getting Started > Create a Linode.
- Click the Create Linode button. Once the Linode has provisioned and has fully powered on, wait for the software installation to complete. If the Linode is powered off or restarted before this time, the software installation will likely fail. To determine if the installation has completed, open the Linode’s Lish console and wait for the system login prompt to appear.
- Follow the instructions within the Getting Started After Deployment section.
Software installation should complete within 2-5 minutes after the Linode has finished provisioning.
Configuration Options
| Field | Description |
|---|---|
| The limited sudo user to be created for the Linode | This is the limited user account to be created for the Linode. This account has sudo user privileges. |
| The password for the limited sudo user | Set a password for the limited sudo user. The password must meet the complexity strength validation requirements for a strong password. This password can be used to perform any action on your server, similar to root, so make it long, complex, and unique. |
| The SSH Public Key that will be used to access the Linode | If you wish to access SSH via Public Key (recommended) rather than by password, enter the public key here. |
| Disable root access over SSH? | The name for your Linode, which must be unique between all of the Linodes on your account. This name is how you identify your server in the Cloud Manager Dashboard. Required. |
| Your Linode API Token | The primary administrative password for your Linode instance. This password must be provided when you log in to your Linode via SSH. The password must meet the complexity strength validation requirements for a strong password. Your root password can be used to perform any action on your server, so make it long, complex, and unique. Required. |
| Subdomain | The subdomain you wish the installer to create a DNS record for during setup. The suggestion given is www. The subdomain should only be provided if you also provide a domain and API Token. |
| Domain | The domain name where you wish to host your Pritunl instance. The installer creates a DNS record for this domain during setup if you provide this field along with your API Token. |
| Admin Email for the server | The start of authority (SOA) email address for this server. This email address will be added to the SOA record for the domain. This is a required field if you want the installer to create DNS records. |
General Options
For advice on filling out the remaining options on the Create a Linode form, see Getting Started > Create a Linode. That said, some options may be limited or recommended based on this Marketplace App:
- Supported distributions: CentOS 7, Ubuntu 18.04 LTS, Ubuntu 20.04 LTS
- Recommended plan: All plan types and sizes can be used.
Getting Started After Deployment
Accessing the Pritunl App
To access your Pritunl instance, Open a browser and navigate to the domain you created in the beginning of your deployment or the IP address of the Linode server. For example, https://203.0.113.0 , replacing the IP address with values for the Linode server and accept the self-signed certificate.
Note: In Chrome, you can accept the self-signed certificate by clicking on Advanced and then click Proceed to (unsafe). In Firefox, click on Advanced, then Add Exception and then Confirm Security Exception.
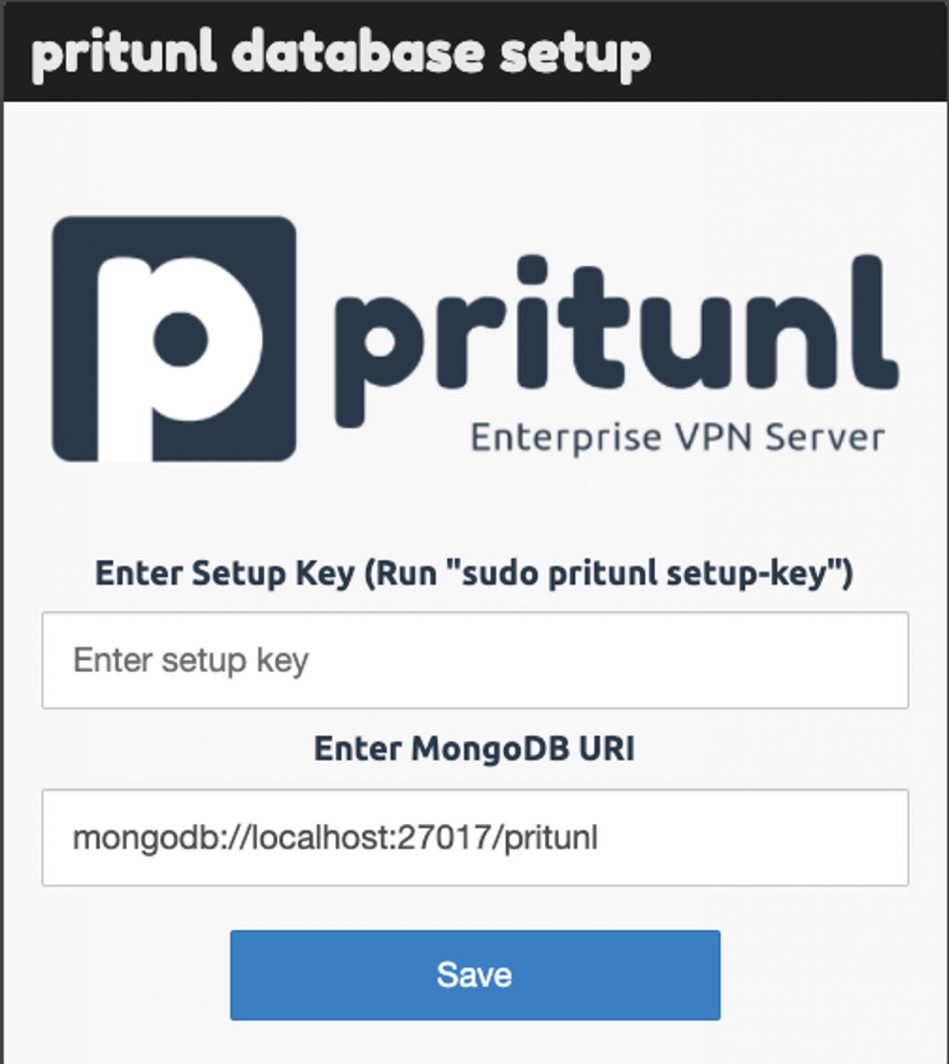
From there you will see the Pritunl Database Setup screen where you can run the command below to obtain your setup key:sudo pritunl setup-key
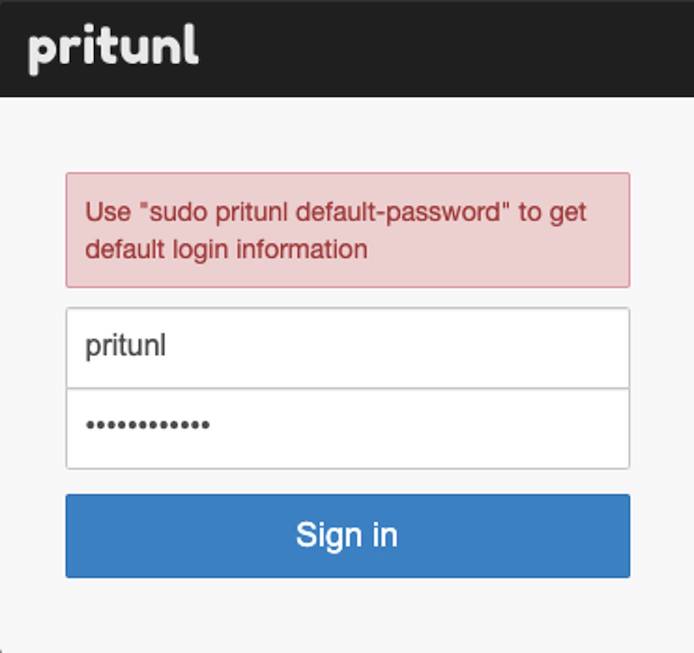
Once the setup key has been entered, you can run the command below to obtain the default login information:sudo pritunl default-password
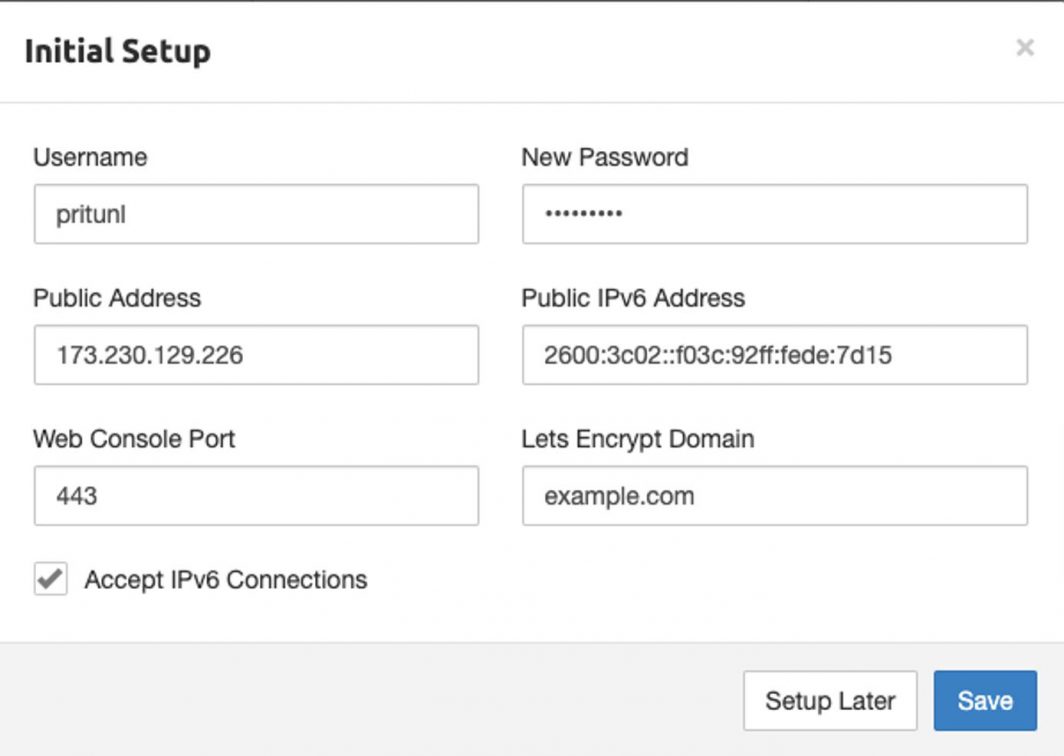
Now that you’re logged in, you can change the default password and enter the domain information so Pritunl can setup the SSL certificates automatically:
Now that you’ve accessed your dashboard, check out the official Pritunl documentation to learn how to add users and further utilize your Pritunl instance.
The Pritunl App was built by Linode. For support regarding app deployment, contact Linode Support via the information listed in the sidebar. For support regarding the tool or software itself, visit the Pritunl User Forums.


