

As streaming platforms continue to take over our screens and revolutionize how we consume content, the importance of building a robust and scalable streaming service has never been more critical. How can organizations ensure compatibility across devices and platforms, while also reducing cost and maximizing efficiency? In this tutorial, we’ll dive into video on-demand transcoding.
We will set up video transcoding using the Linode Kubernetes Engine in order to help scale your transcoding infrastructure based on demand. We’re going to walk through the process of converting an mp4 file to HLS (HTTP Live Streaming), which is a format commonly used by streaming services. HLS uses adaptive bitrate streaming capabilities to ensure smooth playback and a consistent viewing experience, regardless of device or network speed. To get started, we’ll use an mp4 file (this can be an example video you already have as an mp4), upload it to an input bucket, and then we’ll send it to our transcoding partner, Capella, to handle the video transcoding.
Capella is an Akamai partners offering ready-to-deploy solutions that you can run on Akamai Compute. We partnered with Capella on this because they can run encoders on our platform, store VOD assets on Object Storage, and deliver over the Akamai CDN. This partnership also allows us to deploy with Kubernetes and Helm, which makes scaling much easier. For example, in the below tutorial, encoding machines from Capella will spin up automatically to scale for the number of jobs, and then scale back down again when the job is complete, saving thousands of dollars of idle compute time.
Prerequisites:
In order to complete this tutorial, you’ll need to sign up for a Linode Account. It’s free to sign up, plus you get a $100 credit!
- A Linode API Token
- Install kubectl
- Install helm
- Install external Kubernetes tools listed here.
- A Capella License (Email sales@capellasystems.net for a free license)
Step 1: Create a Kubernetes Cluster
The first step is to create a Kubernetes cluster that will do the encoding. From the Akamai Cloud dashboard, click on Kubernetes, and then click on Create Cluster.
Next, let’s enter a few configurations for the cluster. Let’s call it “transcoding-demo”. You should choose the region closest to you here. For me, it’s Los Angeles. It’s also recommended to enable the High Availability Control Plane to activate high availability in the Kubernetes Cluster.
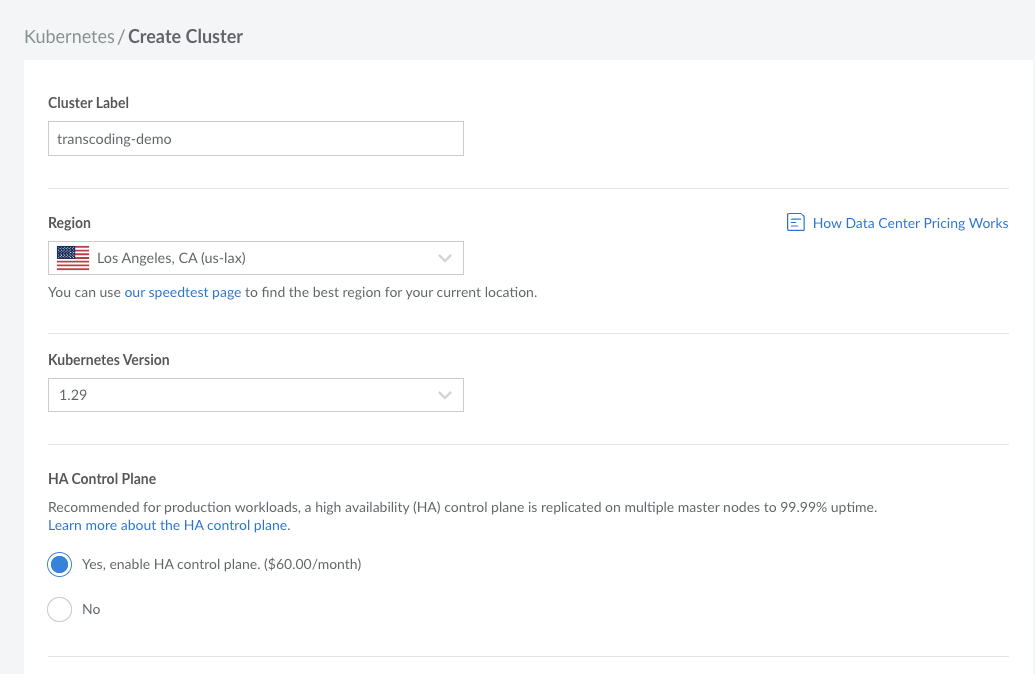
In the Add Node Pools section, let’s add 3 nodes from the Dedicated 8 GB plan. These three nodes are the management nodes, where one is automatically elected as the leader and the other two are for manager redundancy.

Once you add these, you’ll see a button at the top of the screen that says Create Cluster. Click on that to create the Kubernetes cluster. Note: This may take a few minutes.

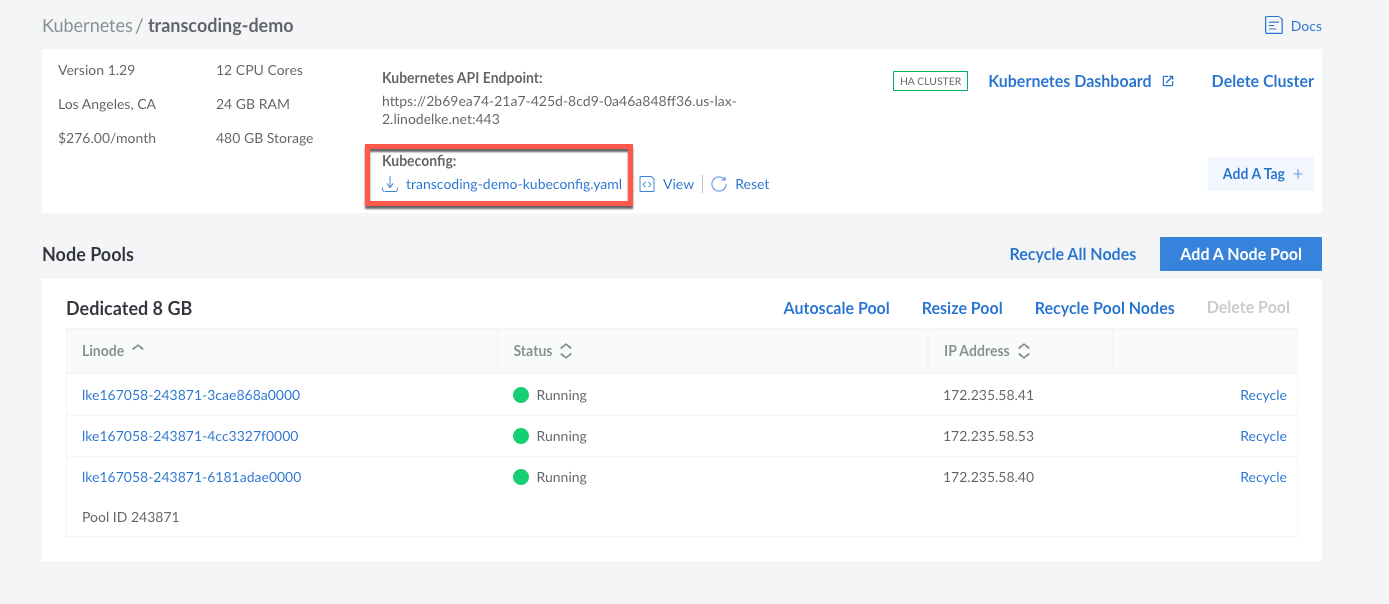
Now, your Kubernetes environment setup is complete. Notice in the Cloud Manager Dashboard the 3 nodes you have created, with status Running.
Next, let’s download the Kubeconfig file by clicking on the link below from the dashboard. It will be downloaded to your local machine. Be sure to move the file to your Kubernetes directory (the same place you have your kubectl set).
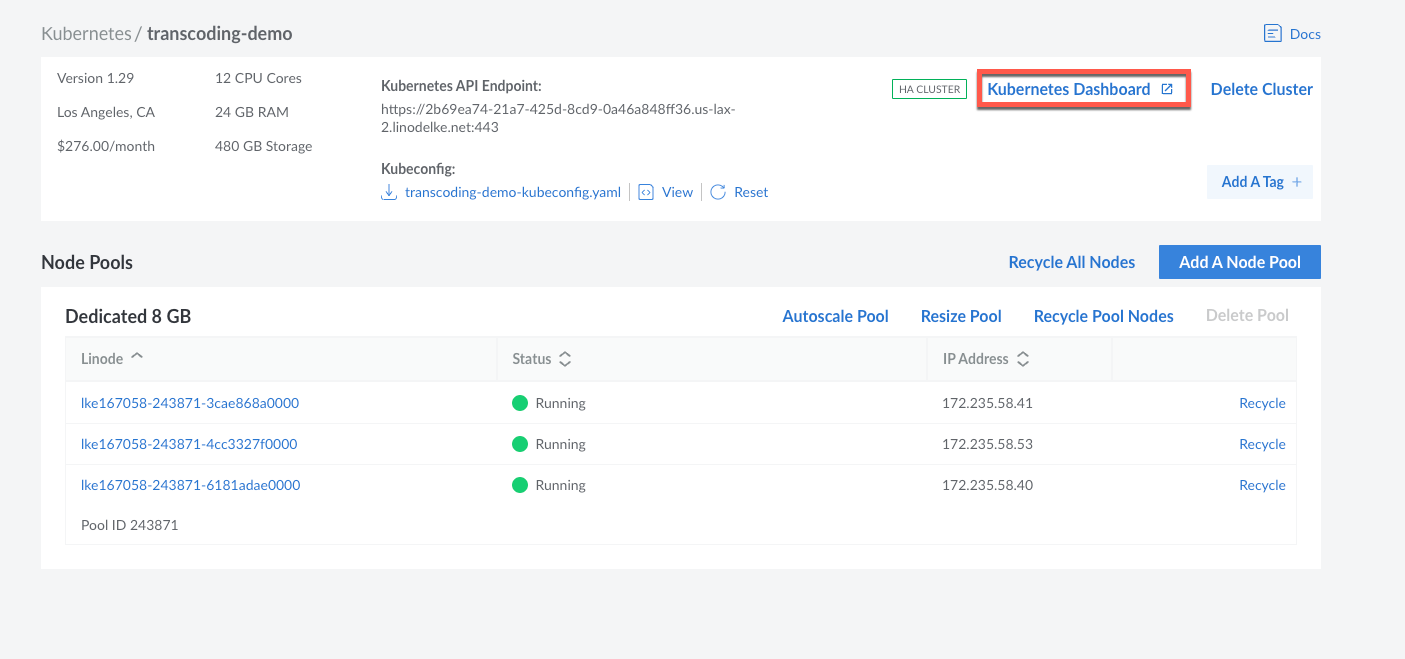
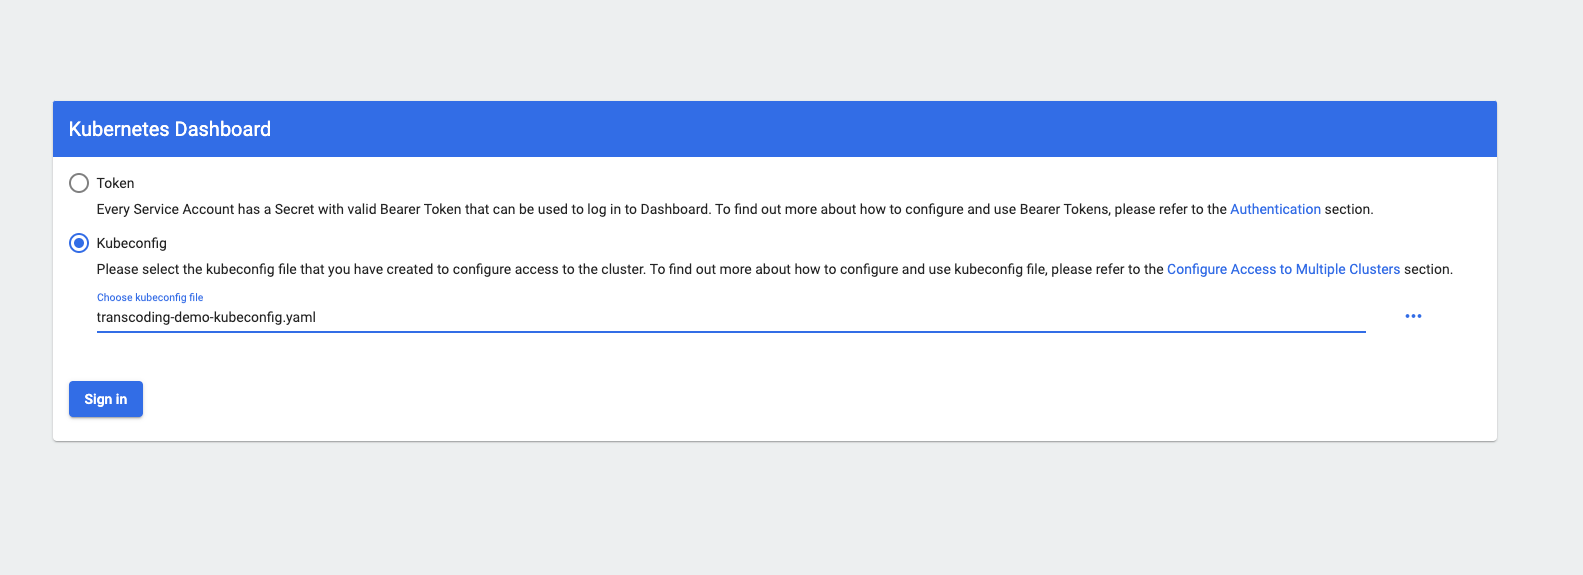
Next, click on the Kubernetes Dashboard link to open the Kubernetes dashboard.
You’ll see this message and you’ll want to click on the option to sign in with your kubeconfig file that you just created.
From the left panel, if you click on Cluster, you will see the nodes you just created.

Step 2: Create and edit the Helm Configuration File
Now, let’s create and edit the Helm Configuration File that will be used to deploy the Cambria Cluster to the Kubernetes environment. A Cambria Cluster is a scalable, transcoding network of multiple Cambria FTC workstations for processing a large volume of video files. The Cambria Cluster Manager routes actions across the network.
First, we’ll download the Capella Cluster Configuration Files Archive with the following two commands:
curl -L -s -o capella-cluster.tgz
helm show values capella-cluster.tgz > capellaCambriaConfig.yaml
In the configuration file, we need to update 2 fields: the Capella License Key and the Linode API Token.
Add your license key that you received (from the Capella team after emailing sales@capellasystems.net in the prerequisites section) in the field ftcLicenseKey.
Then, add your Linode API token (use the link in the prerequisites section to generate one) in the field linodeAPIToken.
Step 3: Install the Cambria Cluster
Now, we need to install the Cambria cluster. This cluster is used for processing a large volume of video files.
helm upgrade –install capella-cluster capella-cluster.tgz –values capellaCambriaConfig.yaml
You’ll see the status changed to deployed.

At this point, there are a few components being deployed to your Kubernetes environment. It’s best to wait a few minutes for everything to be deployed before you continue.
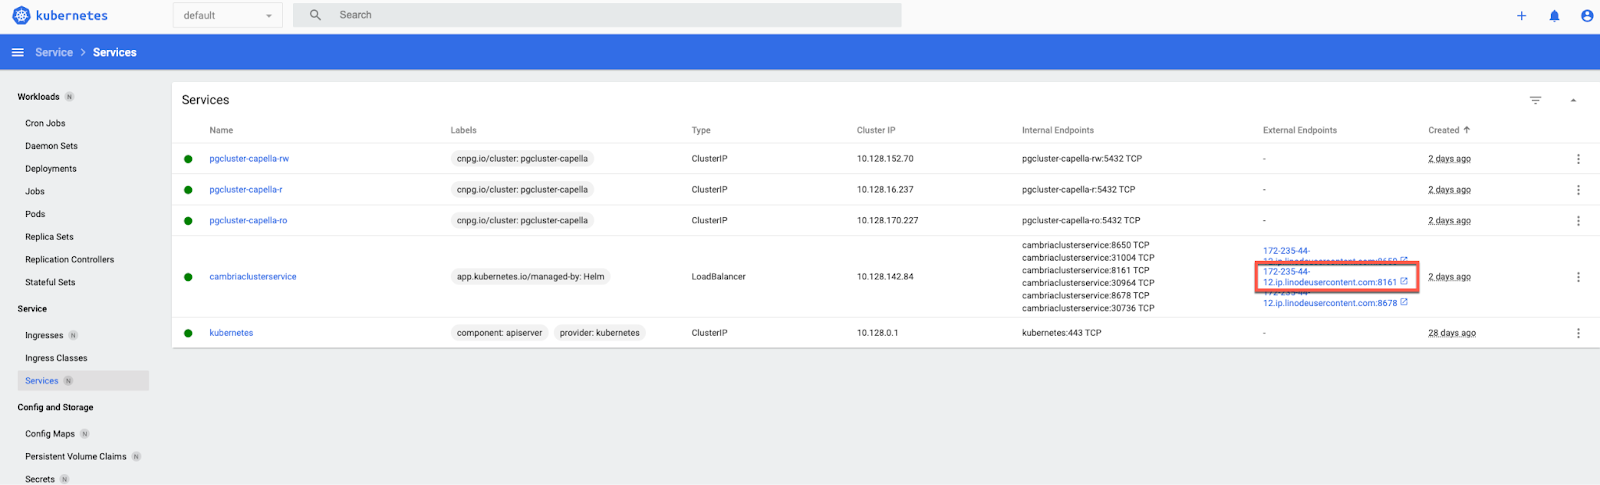
Step 4: Open the Cambria Cluster Web UI
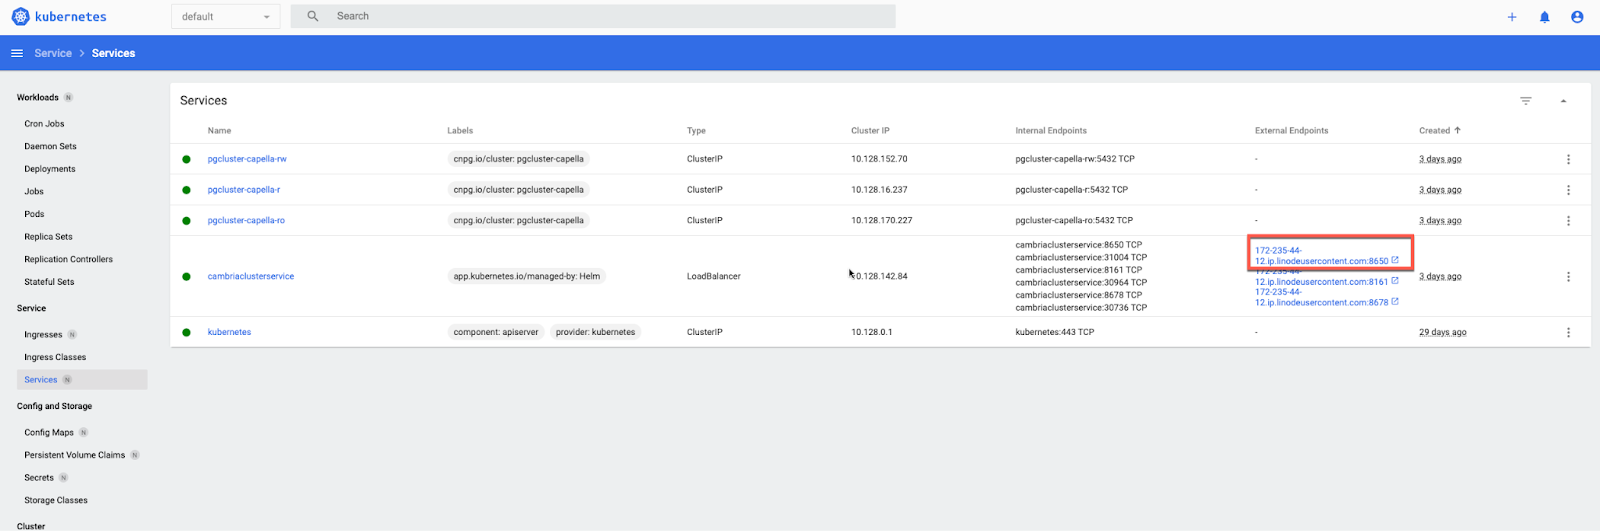
From the left panel of the Kubernetes dashboard, click on Services. Then, copy the IP address from the middle node (port 8161). This port is specific to the Web UI.
In a new tab, enter “https://” and then paste the IP address. (You may need to click Advanced > Enter Site to enter the site). You’ll now see the Cambria Cluster Web UI. Log in with the WebUI credentials from the capellaCambriaConfig.yaml file. (Check page 8 here for more details on how to find these credentials).
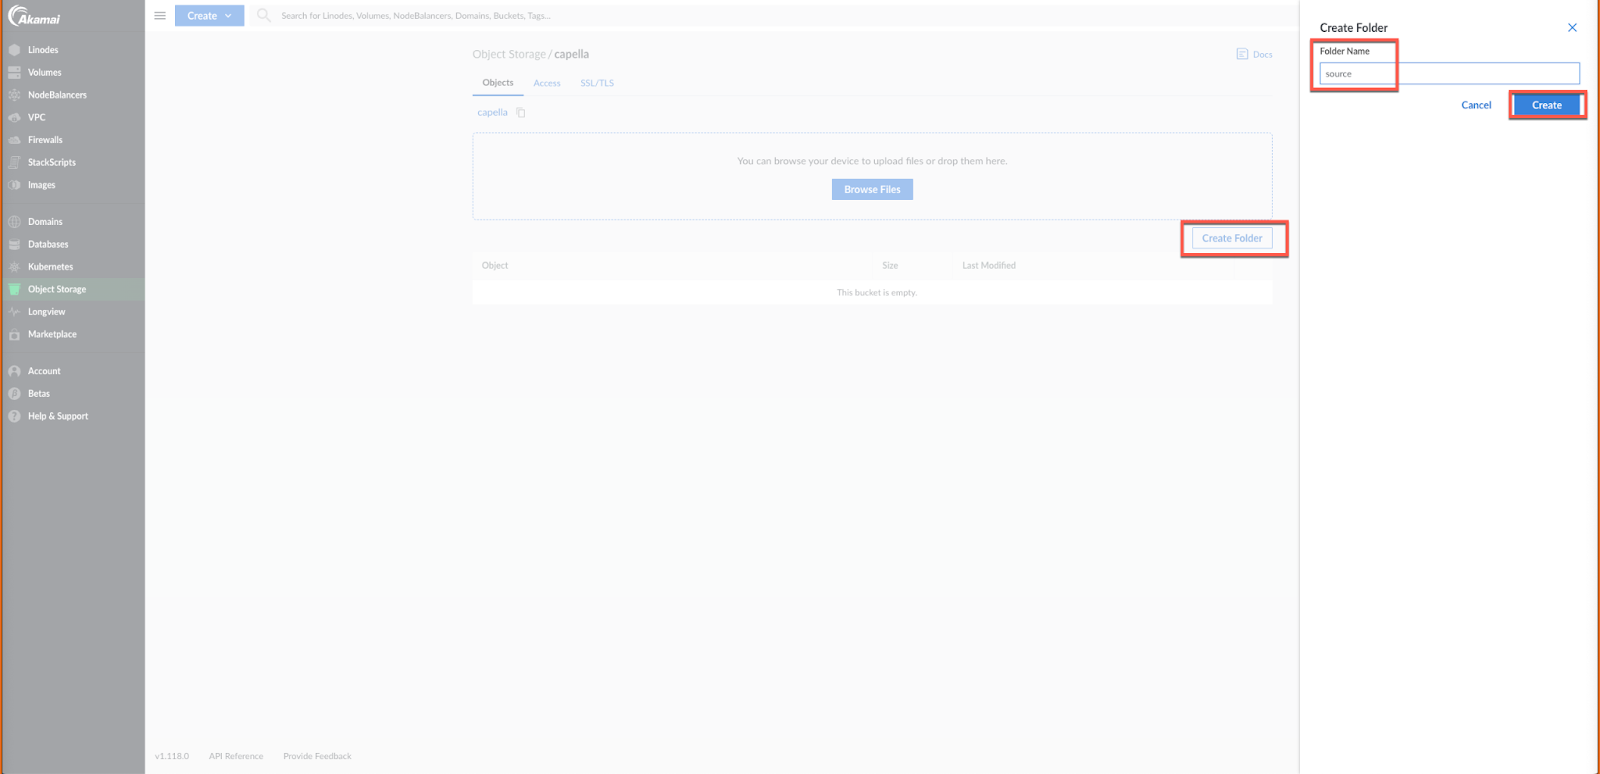
Step 5: Create input and output buckets.
Recall that we are converting an mp4 video to HLS format. We are going to create one bucket with two folders: one for input of our mp4 file, called source, and one for output of our HLS file, called output.
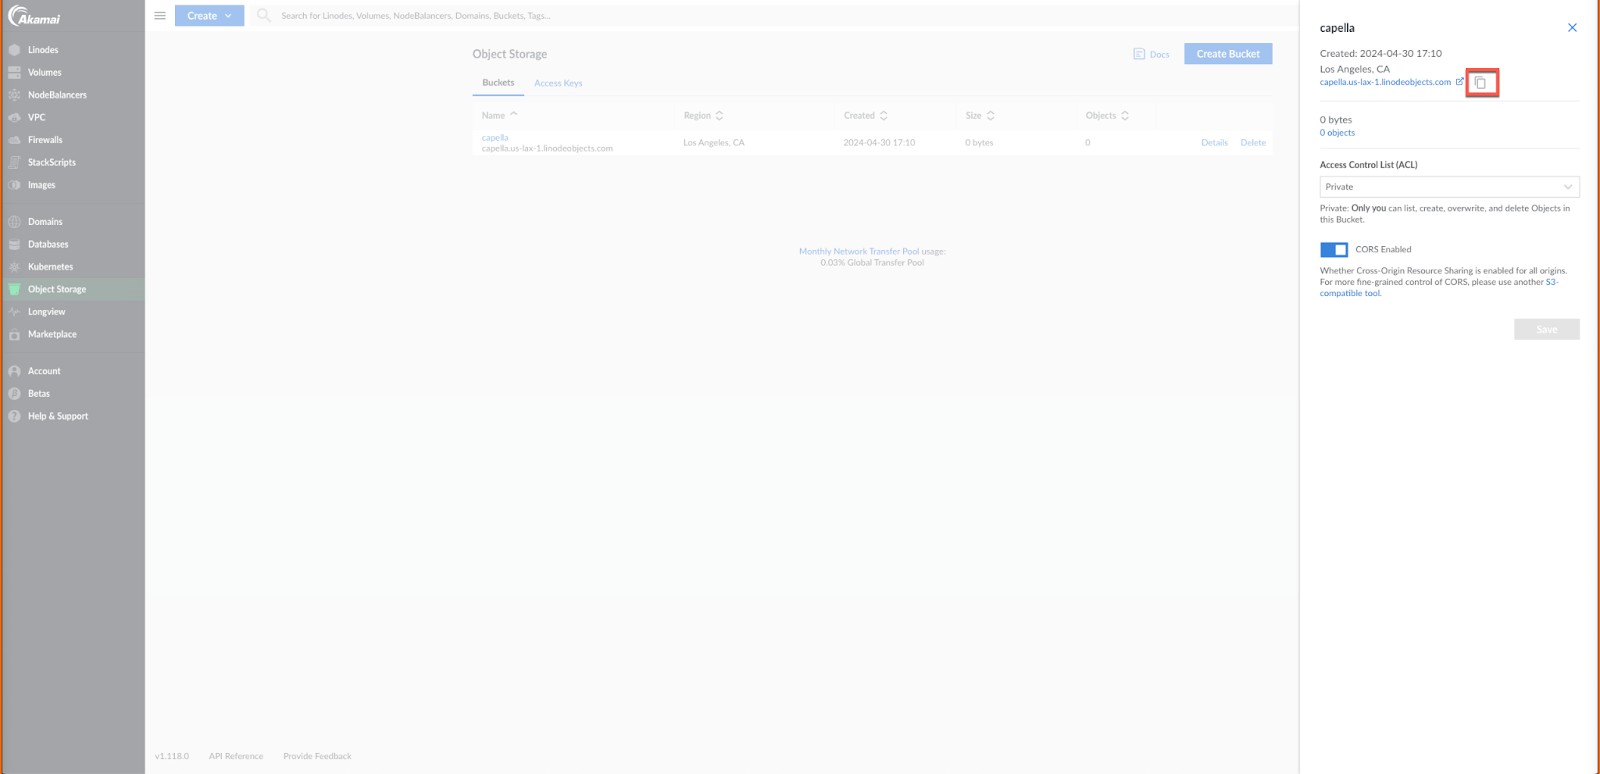
Let’s go to the Akamai Cloud Manager and click on Object Storage from the left panel. Then, click on Create Bucket. Let’s call this capella. Be sure to choose the same region you chose for your Kubernetes cluster above. Then click on Create Bucket.

After we create that bucket, we need to copy its location and paste it later in our XML file. Click on the Details button of the bucket, and then click on the copy button as shown below next to its location. Save this in a notepad because we will need it later.
Next, we need to create access keys for the bucket. Click on Access Keys, and then Create Access Key.

Let’s call this capella-access.
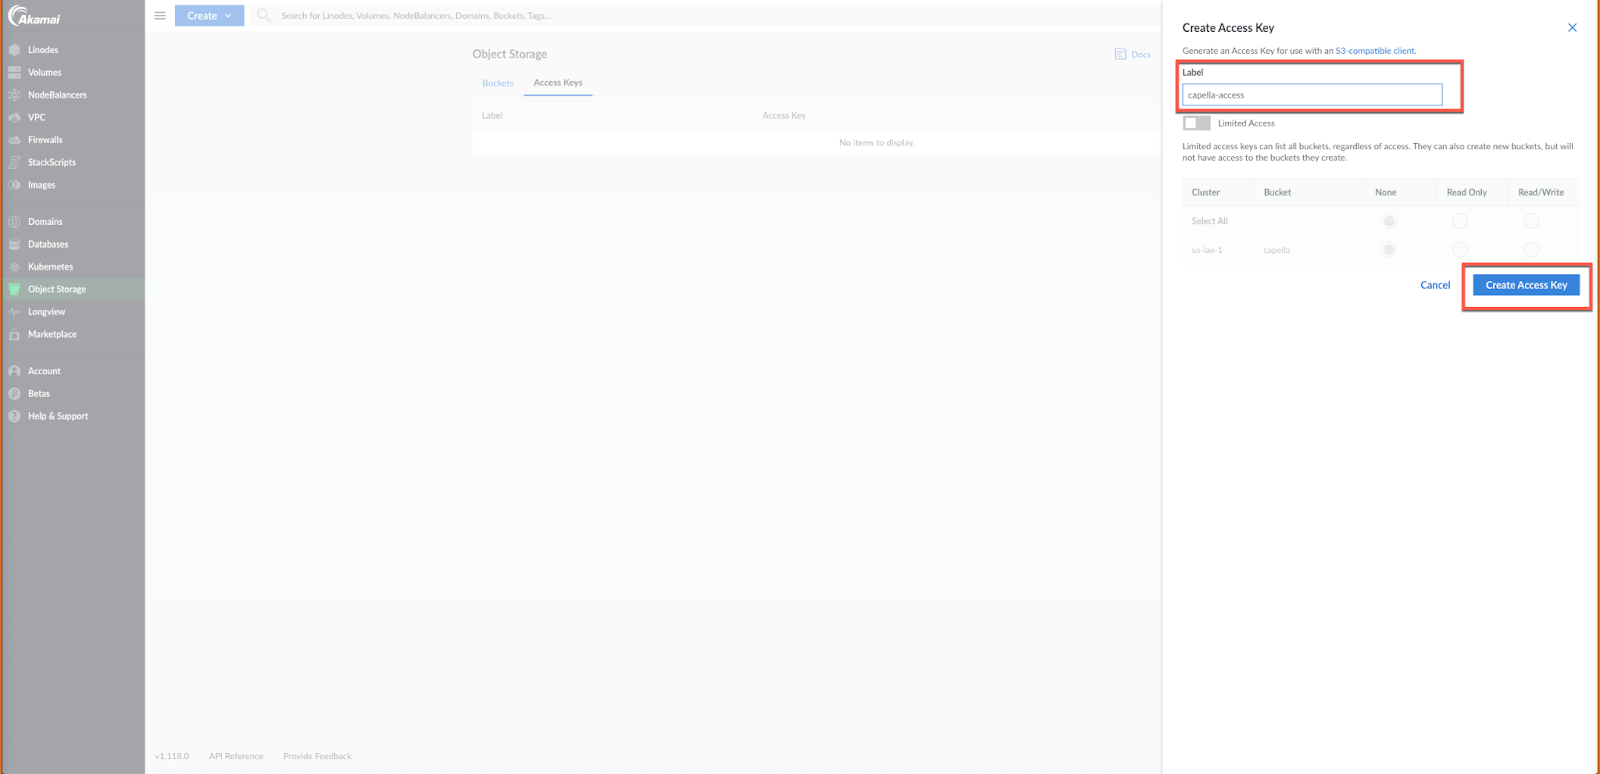
You’ll see a little popup and it will display your access key and secret key. Copy and paste these to a notepad because we will need them later. Once you have saved them, click on I Have Saved My Secret Key.
Now, in our object storage bucket, let’s create 2 folders: one for input, and one for output. Click on your bucket, then click on Create Folder. Let’s call the input folder “source”.
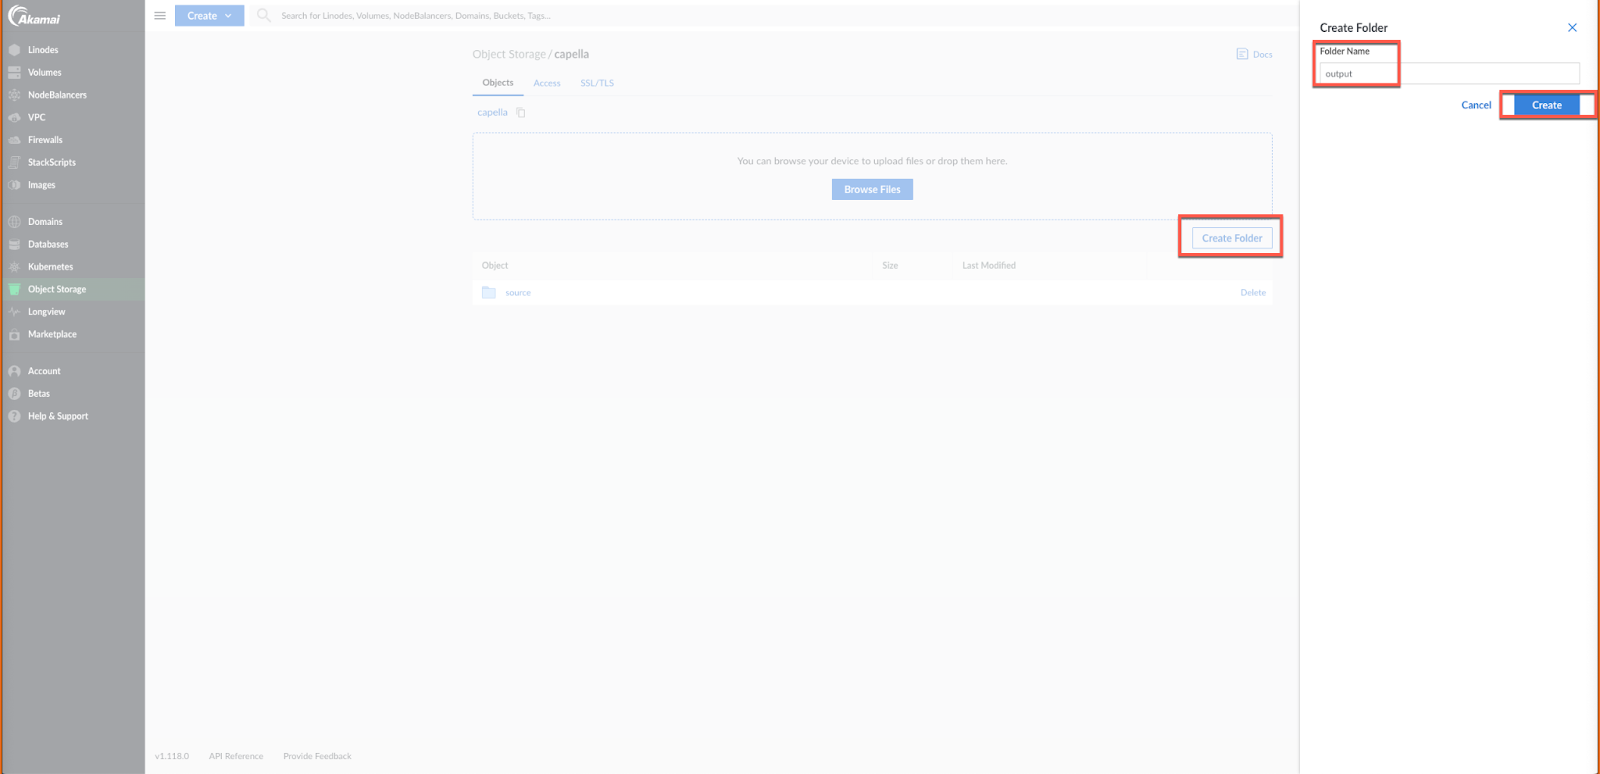
Let’s do the same thing for the output folder. Let’s call this “output”.
Step 6: Edit fields in the sample HLS document.
Capella sent us this sample file to do transcoding jobs for mp4 to HLS conversions. There’s more sample files to choose from, just be sure to ask them which one you want when you email them (check the prerequisites above). Be sure to save it in your Kubernetes folder.
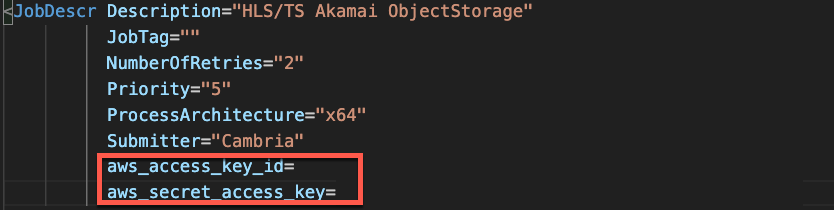
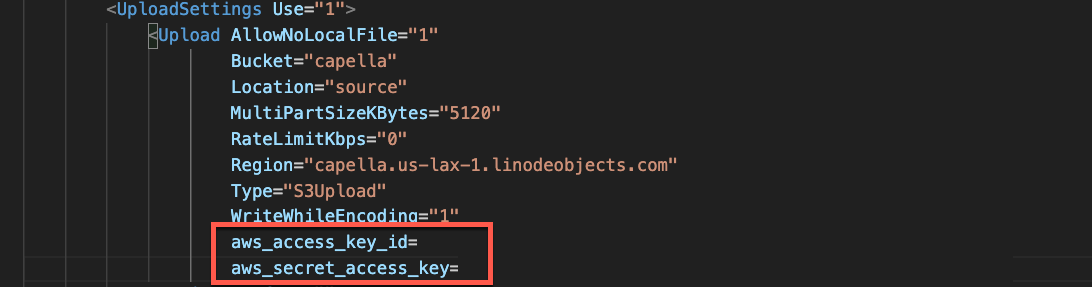
Copy and paste your access key and secret key to the job description section in lines 8 and 9 of the XML file.
Add those same values to lines 234 and 235 in the Upload Settings section.
In Line 231, let’s paste in the region of our bucket. You should have copied it in a notepad from the step above.

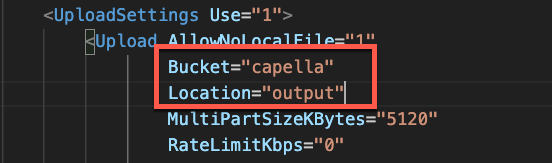
Next, in the Upload Setting section, we need to update the bucket and location fields. In line 227, update the bucket field to be “capella” and in line 228, update the location field to be “output”. (Remember, we created a bucket called capella, and the output folder is called output)
Step 6: Upload an mp4 file to the input bucket
Next, let’s upload an mp4 file to the input bucket. This can be a video of your dog, a cooking video you recorded, any mp4 file. I am using an mp4 file called flying5. Let’s go to the Akamai Cloud Manager and in the source bucket, let’s upload the mp4 file.

Now, back to the XML file. Let’s add the location of the source file to line 347 as shown below.

Step 7: Run the transcoding job
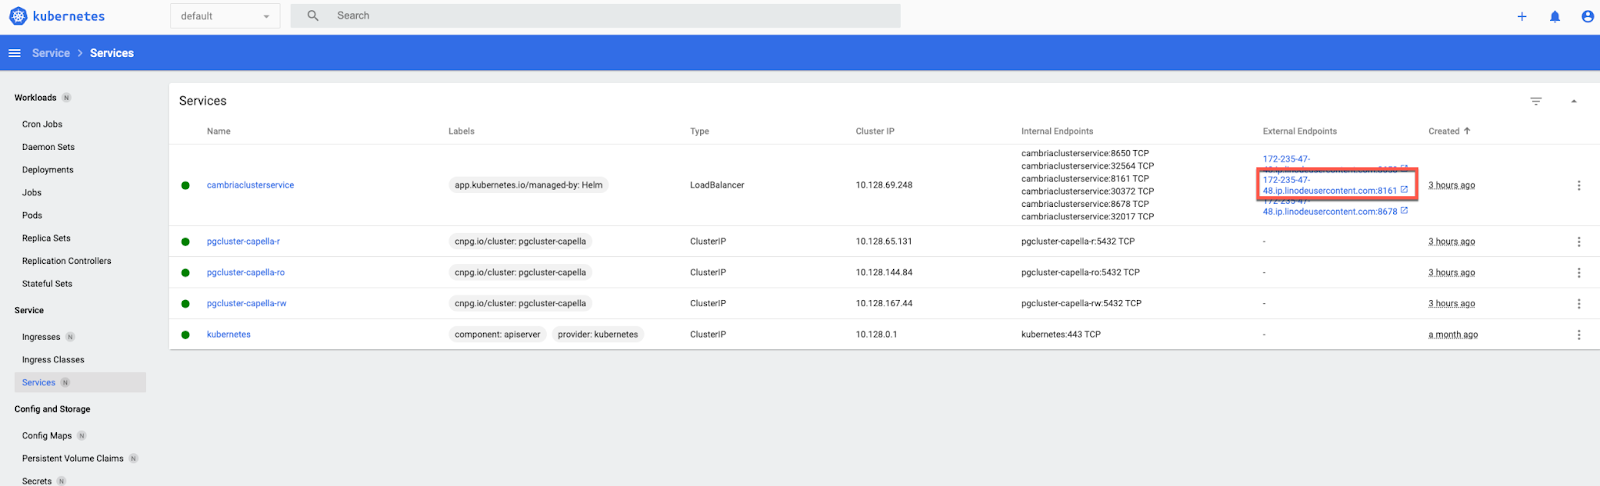
Now, we’re ready to do some transcoding! We’re going to run the transcoding job using an API call. You’ll need to replace a few things in the curl command below. First, navigate to your Kubernetes dashboard and get the IP address from the first node (port 8650). This port is specific to the encoder job communication. Copy it to your clipboard and paste it somewhere to save (everything before .ip). You’ll need this in a minute.
Next, from your capellaCambriaConfig.yaml file, copy the cambriaClusterAPIToken and save it. In the curl command, replace the usertoken value with your API token.
Then, add the name of the transcoding job xml file. I saved mine as mp4-hls-transcoding-job.xml.
Let’s run this command from your terminal.
curl -k -X POST “https://123.456.78.90:8650/CambriaFC/v1/Jobs/?usertoken=12345678-1234-5678-abcd-efghijklmn” -d @mp4-hls-transcoding-job.xml
To confirm the job is running, let’s consult the Kubernetes dashboard. Let’s navigate to the Kubernetes dashboard, and open the following URL for port 8161, which is the job list port.
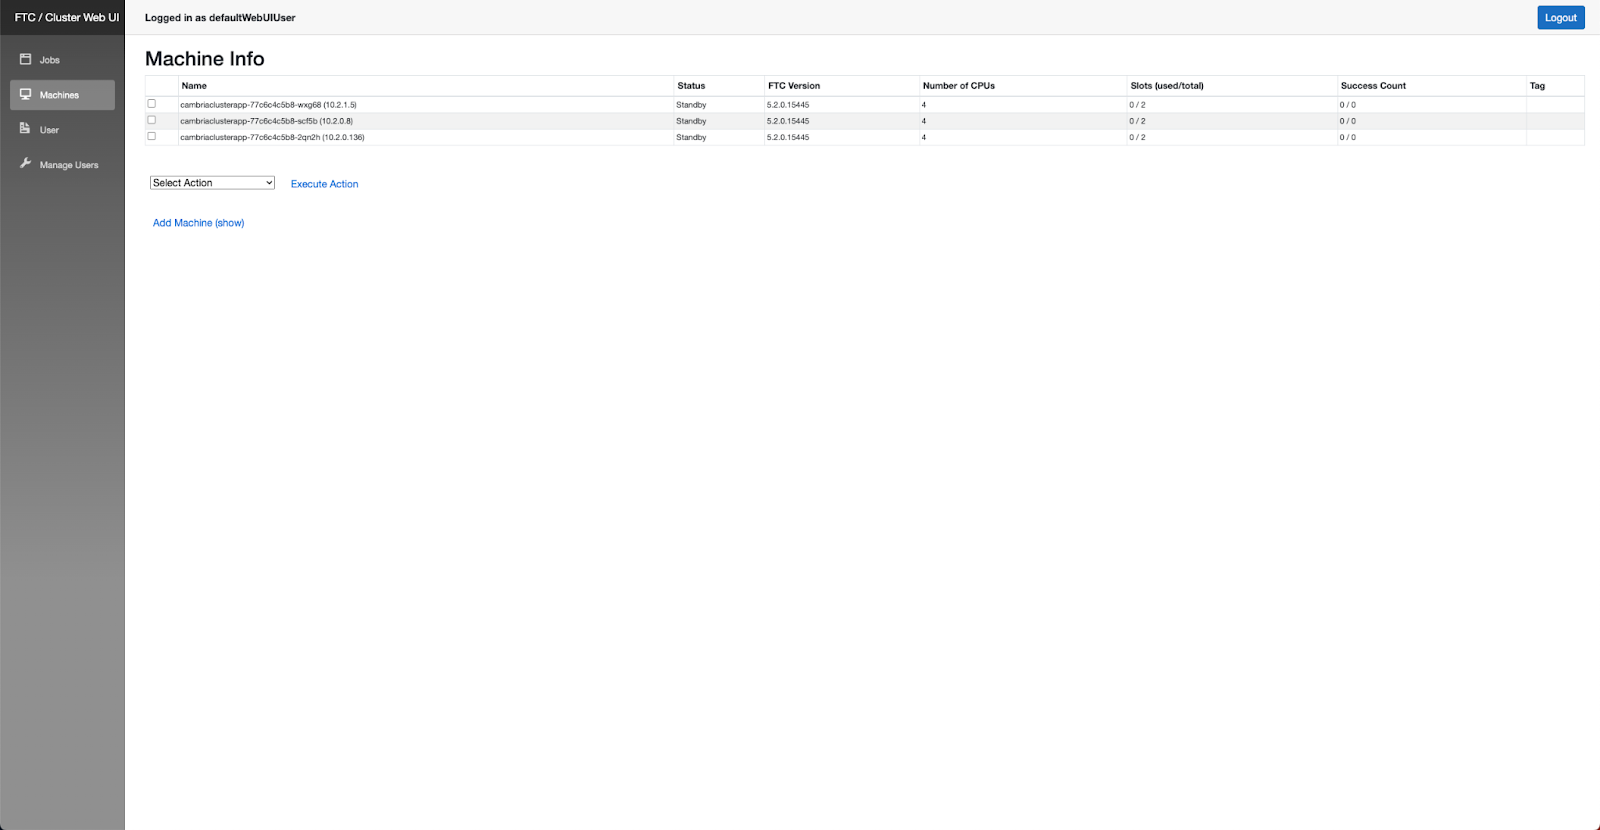
Whenever jobs are submitted to the Cambria Cluster Manager, they will appear in Cambria’s WebUI in the Job List.
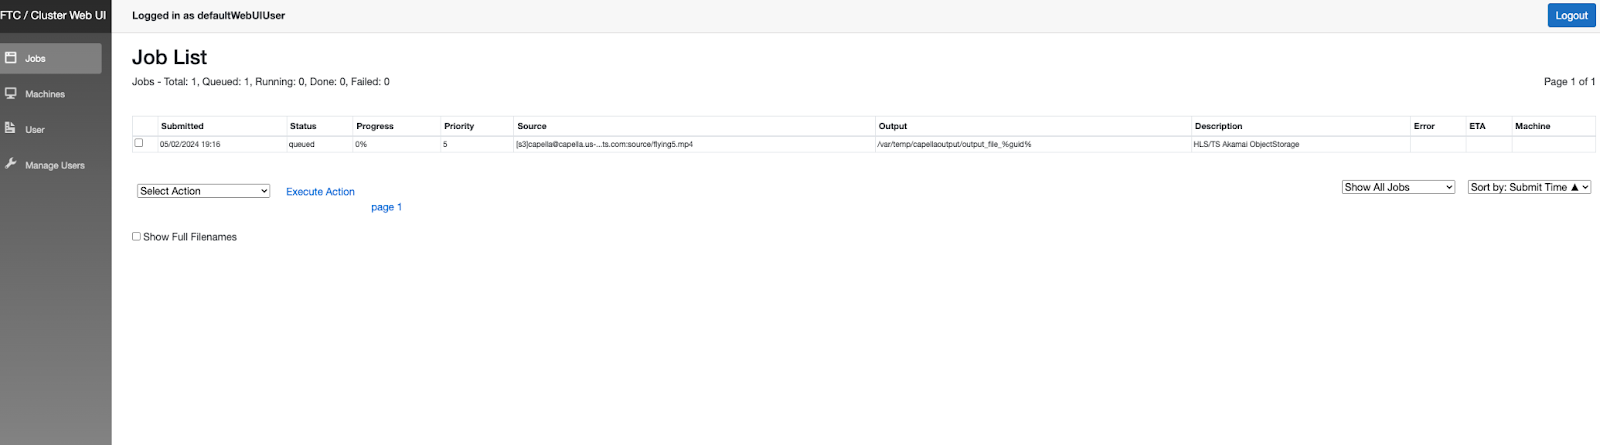
These Jobs will be distributed to the FTC encoding machines to run. The Cambria Cluster Manager will automatically launch a new FTC machine if there were no Jobs in queue previously. Additional FTC machines will be launched to handle the load if the number of Jobs in queue is high.
From the Akamai Linode Kubernetes summary page, you will see a new machine being provisioned. Once the machine is provisioned, you can see it under Nodes in the Kubernetes dashboard and also the Cluster Manager WebUI. Once available and automatically connected to the Cluster, the job will be distributed to the FTC machine to run. The WebUI Job List can be used to track the progress.

Once the job is complete, you’ll see the status changed to done on the WebUI.

It will create 3 different video files with different video types in it. When you go back to the Akamai console, in your output folder you’ll see an output file with a few folders in it. One folder has the audio, one has the video, and one has metadata.
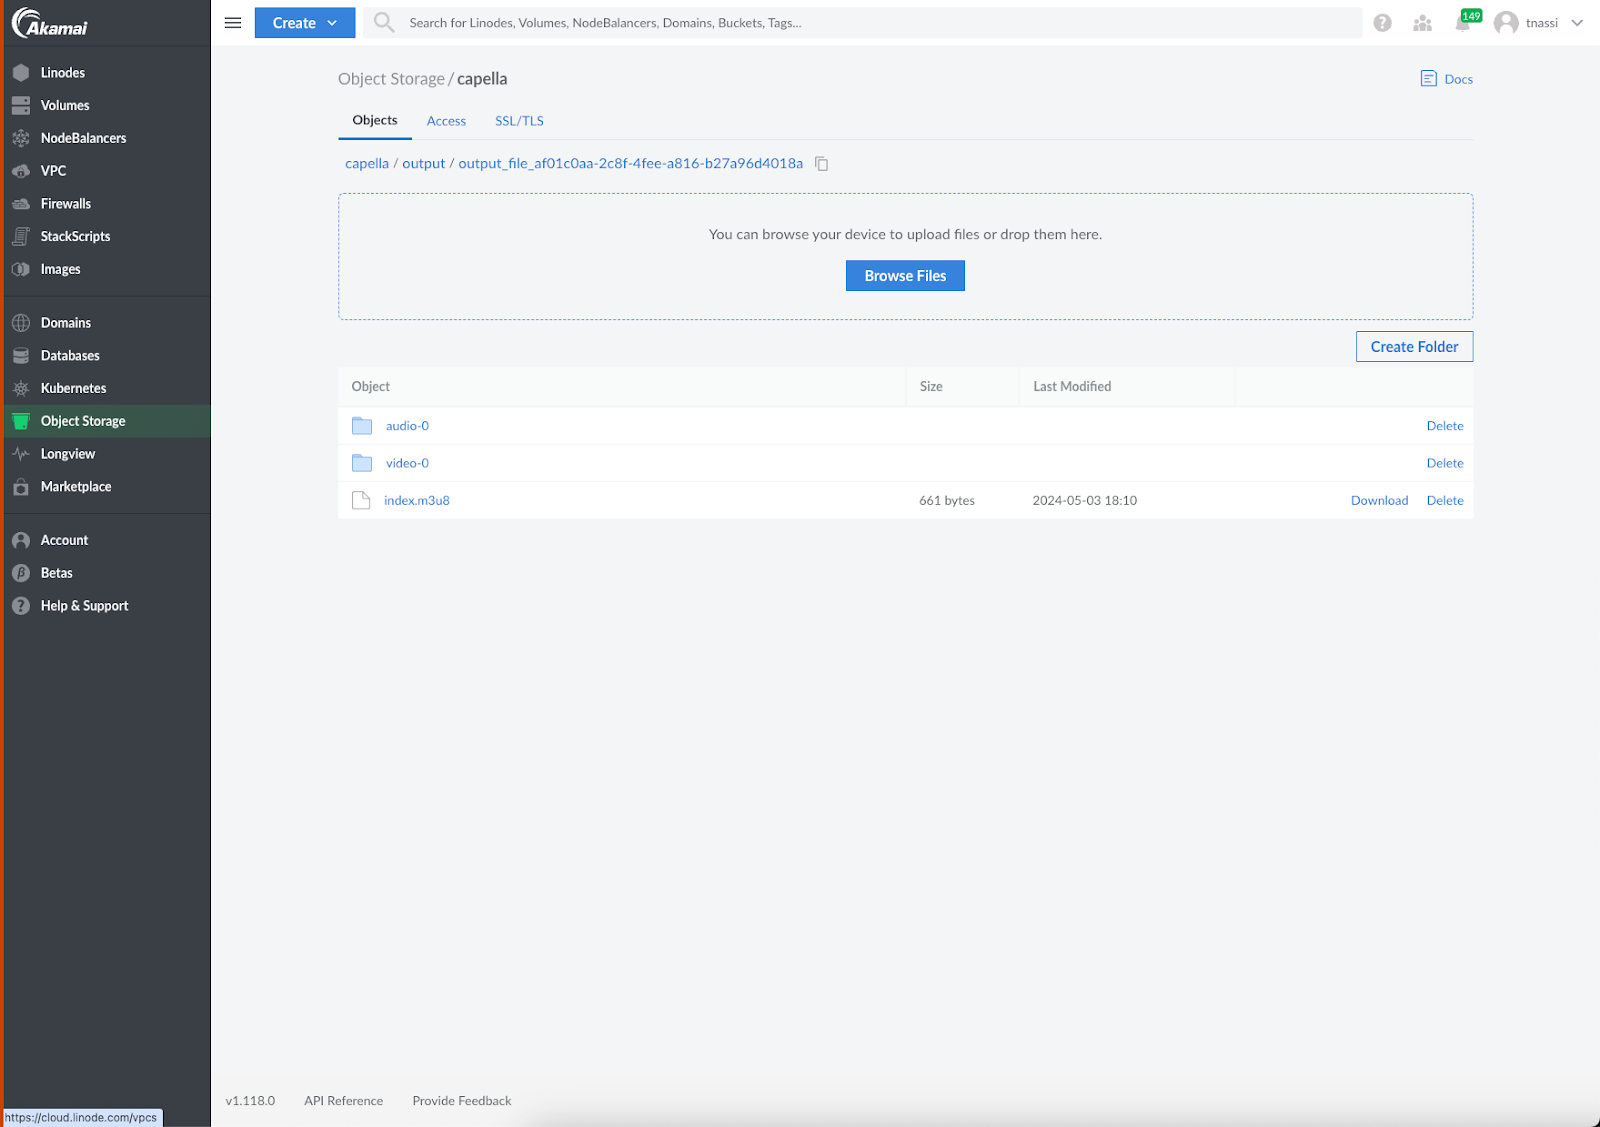
You can play these back through an HLS-enabled player (this could be some sort of plugin into your browser or a third party).
Video transcoding is a crucial aspect of modern multimedia delivery, and by following the steps in this tutorial, you can now tackle this challenge easily!
To Sum Up
This video transcoding example illustrates the flexibility and power of modern multimedia delivery using the Linode Kubernetes Engine (LKE). The encoding machines spin up automatically to scale for the number of jobs, and then scale back down again when the job is complete, demonstrating significant savings achieved when you use LKE.
After successfully transcoding your video, you can leverage Akamai’s network of servers strategically distributed across the globe, in order to ensure that your HLS-formatted videos are delivered quickly and seamlessly to your audience, regardless of their geographical location. This will help to alleviate the load on your origin server by offloading content delivery to Akamai’s distributed edge servers. This not only improves the performance and scalability of your video delivery but also enhances the overall user experience by reducing latency and buffering. Additionally, Akamai CDN offers advanced features such as adaptive bitrate streaming, which automatically adjusts the video quality based on the viewer’s network conditions, ensuring smooth playback across a variety of devices and connection speeds. This is especially crucial for delivering high-quality video content to mobile devices and areas with limited bandwidth.
Next Steps
In this tutorial, we used Akamai to transcode a video from mp4 format to HLS format. This conversion ensures compatibility with different devices for streaming. You can find a full list of possible input and output formats for video transcoding here.
If you’d like to learn more about how to implement video transcoding, sign up for our newsletter, connect with us on Twitter or LinkedIn, or subscribe to our YouTube channel.
In addition to these technical guides, if you or your organization is considering optimizing its video transcoding and Kubernetes solutions, you can try Linode’s solutions by signing up to get $100 in free credits.

Comments