

This post is part of our Scaling Kubernetes Series. Register to watch live or access the recording, and check out our other posts in this series:
Reducing infrastructure costs boils down to turning resources off when they’re not being utilized. However, the challenge is figuring out how to turn these resources on automatically when necessary. Let’s run through the required steps to deploy a Kubernetes cluster using Linode Kubernetes Engine (LKE) and use the Kubernetes Events-Driven Autoscaler (KEDA) to scale to zero and back.
Why Scale to Zero
Let’s imagine you are running a reasonably resource-intensive app on Kubernetes and it’s only needed during work hours.
You might want to turn it off when people leave the office and back on when they start the day.
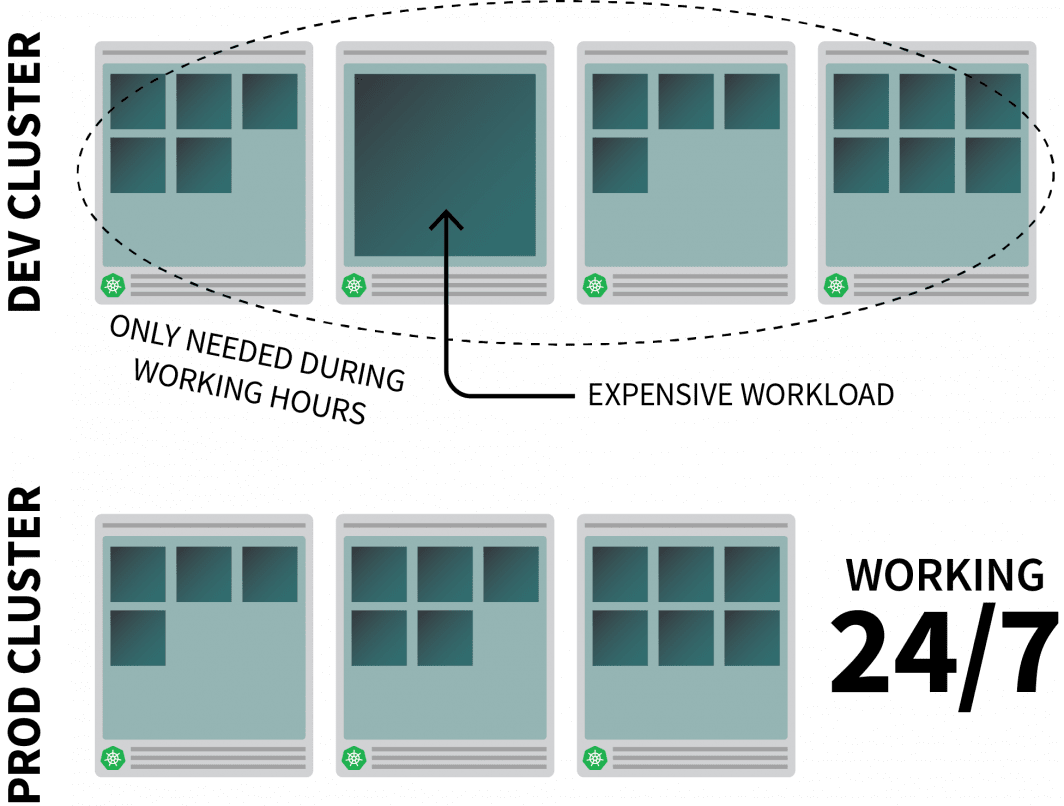
While you could use a CronJob to scale up and down the instance, this solution is a stop-gap that can only run on a pre-set schedule.
What happens during the weekend? And what about public holidays? Or when the team is off sick?
Instead of generating an ever-growing list of rules, you can scale up your workloads based on traffic. When the traffic increases, you can scale the replicas. If there is no traffic, you can turn the app off. If the app is switched off and there’s a new incoming request, Kubernetes will launch at least a single replica to handle the traffic.

Next, let’s talk about how to:
- intercept all the traffic to your apps;
- monitor traffic; and
- set up the autoscaler to adjust the number of replicas or turn off the apps.
If you prefer to read the code for this tutorial, you can do that on the LearnK8s GitHub.
Creating a Cluster
Let’s start with creating a Kubernetes cluster.
The following commands can be used to create the cluster and save the kubeconfig file.
bash
$ linode-cli lke cluster-create \
 --label cluster-manager \
 --region eu-west \
 --k8s_version 1.23

$ linode-cli lke kubeconfig-view "insert cluster id here" --text | tail +2 | base64 -d > kubeconfig
You can verify that the installation is successful with:
bash
$ kubectl get pods -A --kubeconfig=kubeconfig
Exporting the kubeconfig file with an environment variable is usually more convenient.
You can do so with:
bash
$ export KUBECONFIG=${PWD}/kubeconfig
$ kubectl get pods
Now let’s deploy an application.
Deploy an Application
yaml
apiVersion: apps/v1
kind: Deployment
metadata:
 name: podinfo
spec:
 selector:
   matchLabels:
     app: podinfo
 template:
   metadata:
     labels:
       app: podinfo
   spec:
     containers:
     - name: podinfo
       image: stefanprodan/podinfo
       ports:
       - containerPort: 9898
---
apiVersion: v1
kind: Service
metadata:
 name: podinfo
spec:
 ports:
   - port: 80
     targetPort: 9898
 selector:
   app: podinfo
You can submit the YAML file with:
terminal|command=1|title=bash
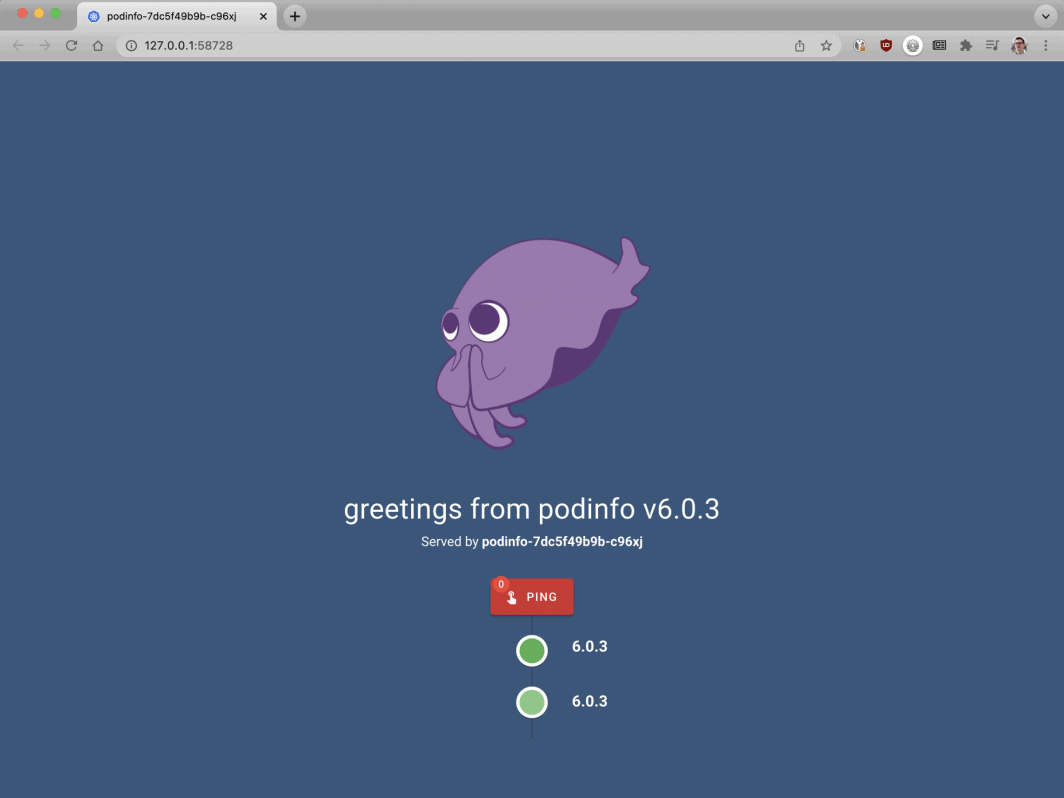
$ kubectl apply -f 1-deployment.yamlAnd you can visit the app with:
Open your browser to localhost:8080.
bash
$ kubectl port-forward svc/podinfo 8080:80
At this point, you should see the app.
Next, let’s install KEDA — the autoscaler.
KEDA — the Kubernetes Event-Driven Autoscaler
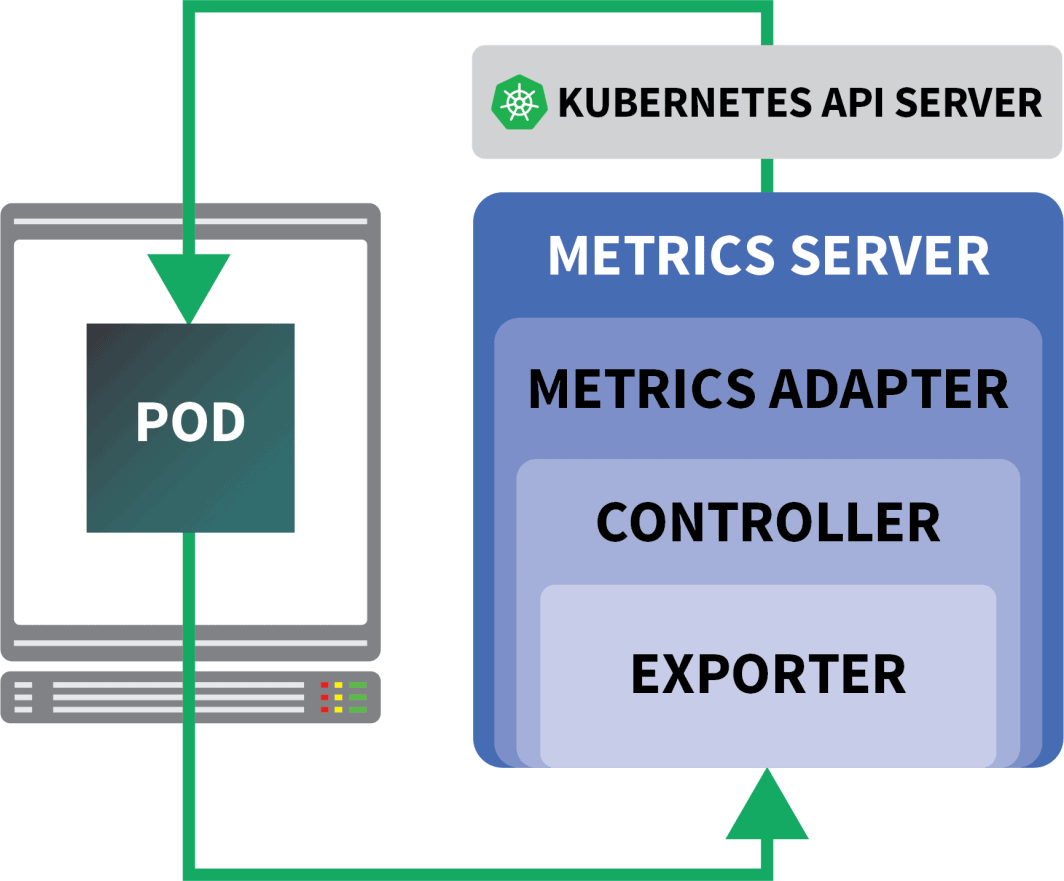
Kubernetes offers the Horizontal Pod Autoscaler (HPA) as a controller to increase and decrease replicas dynamically.
Unfortunately, the HPA has a few drawbacks:
- It doesn’t work out of the box– you need to install a Metrics Server to aggregate and expose the metrics.
- It doesn’t scale to zero replicas.
- It scales replicas based on metrics, and doesn’t intercept HTTP traffic.
Fortunately, you don’t have to use the official autoscaler, but you can use KEDA instead.
KEDA is an autoscaler made of three components:
- A Scaler
- A Metrics Adapter
- A Controller
Scalers are like adapters that can collect metrics from databases, message brokers, telemetry systems, etc.
For example, the HTTP Scaler is an adapter that can intercept and collect HTTP traffic.
You can find an example of a scaler using RabbitMQ here.
The Metrics Adapter is responsible for exposing the metrics collected by the scalers in a format that the Kubernetes metrics pipeline can consume.
And finally, the controller glues all the components together:
- It collects the metrics using the adapter and exposes them to the metrics API.
- It registers and manages the KEDA-specific Custom Resource Definitions (CRDs) — i.e. ScaledObject, TriggerAuthentication, etc.
- It creates and manages the Horizontal Pod Autoscaler on your behalf.
That’s the theory, but let’s see how it works in practice.
A quicker way to install the controller is to use Helm.
You can find the installation instructions on the official Helm website.
bash
$ helm repo add kedacore https://kedacore.github.io/charts
$ helm install keda kedacore/keda
KEDA doesn’t come with an HTTP scaler by default, so you will have to install it separately:
bash
$ helm install http-add-on kedacore/keda-add-ons-http
At this point, you are ready to scale the app.
Defining an Autoscaling Strategy
The KEDA HTTP add-on exposes a CRD where you can describe how your application should be scaled.
Let’s have a look at an example:
yaml
kind: HTTPScaledObject
apiVersion: http.keda.sh/v1alpha1
metadata:
   name: podinfo
spec:
   host: example.com
   targetPendingRequests: 100
   scaleTargetRef:
       deployment: podinfo
       service: podinfo
       port: 80
   replicas:
       min: 0
       max: 10
This file instructs interceptors to forward requests for example.com to the podinfo service.
It also includes the name of the deployment that should be scaled — in this case, podinfo.
Let’s submit the YAML to the cluster with:
bash
$ kubectl apply -f scaled-object.yaml
As soon as you submit the definition, the pod is deleted!
But why?
After an HTTPScaledObject is created, KEDA immediately scales the deployment to zero since there’s no traffic.
You must send HTTP requests to the app to scale it.
Let’s test this by connecting to the service and issuing a request.
bash
$ kubectl port-forward svc/podinfo 8080:80
The command hangs!
It makes sense; there are no pods to serve the request.
But why is Kubernetes not scaling the deployment to 1?
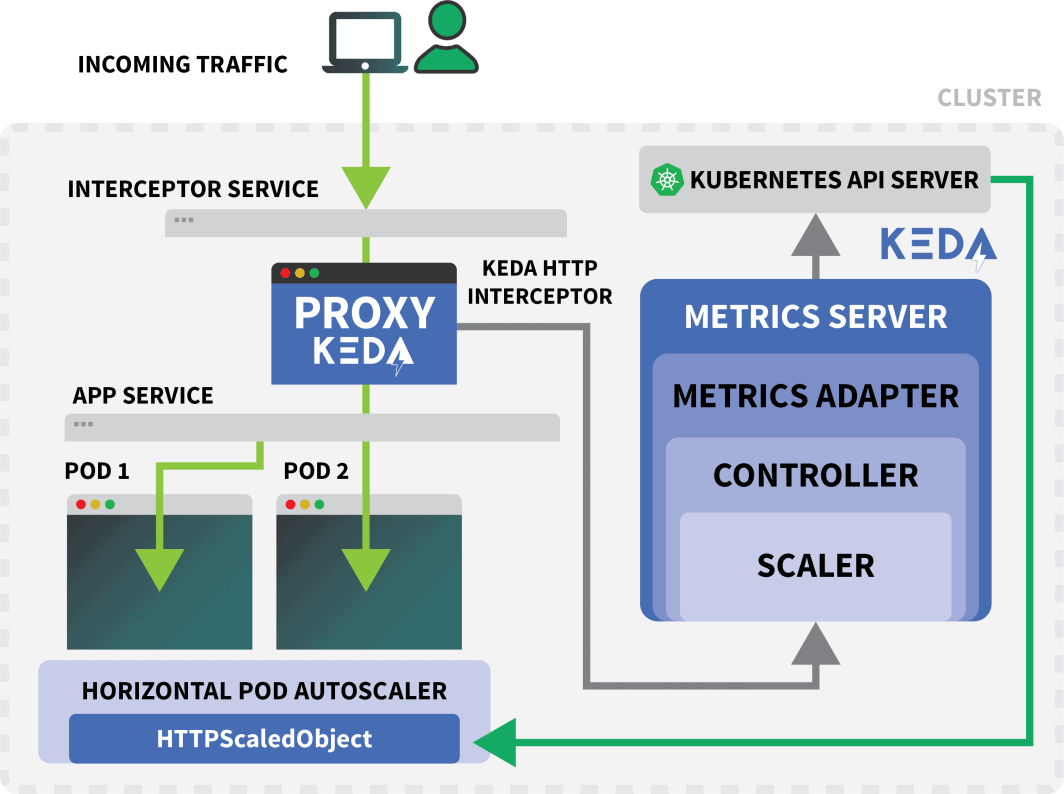
Testing the KEDA Interceptor
A Kubernetes Service called keda-add-ons-http-interceptor-proxy was created when you used Helm to install the add-on.
For autoscaling to work appropriately, the HTTP traffic must route through that service first.
You can use kubectl port-forward to test it:
shell
$ kubectl port-forward svc/keda-add-ons-http-interceptor-proxy 8080:8080
This time, you can’t visit the URL in your browser.
A single KEDA HTTP interceptor can handle several deployments.
So how does it know where to route the traffic?
yaml
kind: HTTPScaledObject
apiVersion: http.keda.sh/v1alpha1
metadata:
   name: podinfo
spec:
   host: example.com
   targetPendingRequests: 100
   scaleTargetRef:
       deployment: podinfo
       service: podinfo
       port: 80
   replicas:
       min: 0
       max: 10
The HTTPScaledObject has a host field that is used precisely for that.
In this example, pretend the request comes from example.com.
You can do so by setting the Host header:
bash
$ curl localhost:8080 -H 'Host: example.com'
You will receive a response, albeit with a slight delay.
If you inspect the pods, you’ll notice that the deployment was scaled to a single replica:
bash
$ kubectl get pods
So what just happened?
When you route traffic to the KEDA’s service, the interceptor keeps track of the number of pending HTTP requests that haven’t had a reply yet.
The KEDA scaler periodically checks the size of the queue of the interceptor and stores the metrics.
The KEDA controller monitors the metrics and increases or decreases the number of replicas as needed. In this case, a single request is pending — enough for the KEDA controller to scale the deployment to a single replica.
You can fetch the state of an individual interceptor’s pending HTTP request queue with:
bash
$ kubectl proxy &
$ curl -L localhost:8001/api/v1/namespaces/default/services/keda-add-ons-http-interceptor-admin:9090/proxy/queue
{"example.com":0,"localhost:8080":0}
Due to this design, you must be careful how you route traffic to your apps.
KEDA can only scale the traffic if it can be intercepted.
If you have an existing ingress controller and wish to use that to forward the traffic to your app, you’ll need to amend the ingress manifest to forward the traffic to the HTTP add-on service.
Let’s have a look at an example.
Combining the KEDA HTTP Add-On with the Ingress
You can install the nginx-ingress controller with Helm:
bash
$ helm upgrade --install ingress-nginx ingress-nginx \
 --repo https://kubernetes.github.io/ingress-nginx \
 --namespace ingress-nginx --create-namespace
Let’s write an ingress manifest to route the traffic to podinfo:
yaml
apiVersion: networking.k8s.io/v1
kind: Ingress
metadata:
 name: podinfo
spec:
 ingressClassName: nginx
 rules:
 - host: example.com
   http:
     paths:
     - path: /
       pathType: Prefix
       backend:
         service:
           name: keda-add-ons-http-interceptor-proxy # <- this
           port:
             number: 8080
You can retrieve the IP of the load balancer with:
bash
LB_IP=$(kubectl get services -l "app.kubernetes.io/component=controller" -o jsonpath="{.items[0].status.loadBalancer.ingress
[0].ip}" -n ingress-nginx)
You can finally make a request to the app with:
bash
curl $LB_IP -H "Host: example.com"
It worked!
If you wait long enough, you’ll notice that the deployment will eventually scale to zero.
How Does This Compare to Serverless on Kubernetes?
There are several significant differences between this setup and a serverless framework on Kubernetes such as OpenFaaS:
- With KEDA, there is no need to re-architecture or use an SDK to deploy the app.
- Serverless frameworks take care of routing and serving requests. You only write the logic.
- With KEDA, deployments are regular containers. With a serverless framework, that’s not always true.
Want to see this scaling in action? Register for our Scaling Kubernetes webinar series.
Comments (5)
Very nice tutorial. In the case without the nginx ingress, can you explain how to access from the outside, instead of the localhost? I tried to use a NodePort service, but the port gets closed when the Interceptor is installed. The Interceptor proxy is a ClusterIP service. How can we access it from the outside? Is there any sort of kubectl port forwarding instruction?
Hi Rui! I forwarded your question to Daniele and here is his response:
It should work with NodePort, but you have to set the right header (i.e.
Host: example.com) when you make the request. There is no way for the interceptor to decide where the traffic should go without that.Muito bom o conteudo!!!
Where does NodeBalancer show up in this configuration? Does LKE take over that job?
Hi Lee – The NodeBalancer is created during the installation of the nginx-ingress controller. For a more detailed explanation of this process you can check out our guide titled Deploying NGINX Ingress on Linode Kubernetes Engine.
Once the NodeBalancer is provisioned it is controlled via LKE. We don’t recommend configuring the settings of your LKE NodeBalancers through the Cloud Manager.